
Papercups: Customer Service Platform
- Intro
Content
We are living in an interesting time, where large language models are reshaping the way we interact with the world. One of the areas where this impact is most noticeable is in communication with real people, such as in customer support.
It used to be necessary to have a team handle all of a company’s interactions with customers — answering phones, emails, and live chats. This is changing as AI has advanced enough to provide seamless, high-quality conversations with humans.
That said, we still need to build the supporting infrastructure to integrate LLMs.
In this episode, we’ll explore how to build a communication platform similar to Zendesk or Intercom. We’ll use the Papercups architecture as our example.
Papercups is a self-hosted, open-source customer service platform. It integrates with various communication channels like email, SMS, Slack, Mattermost, and a live chat widget on your website or mobile app.
Architecture
We’ll kick off our review with the high-level architecture of Paparcups.
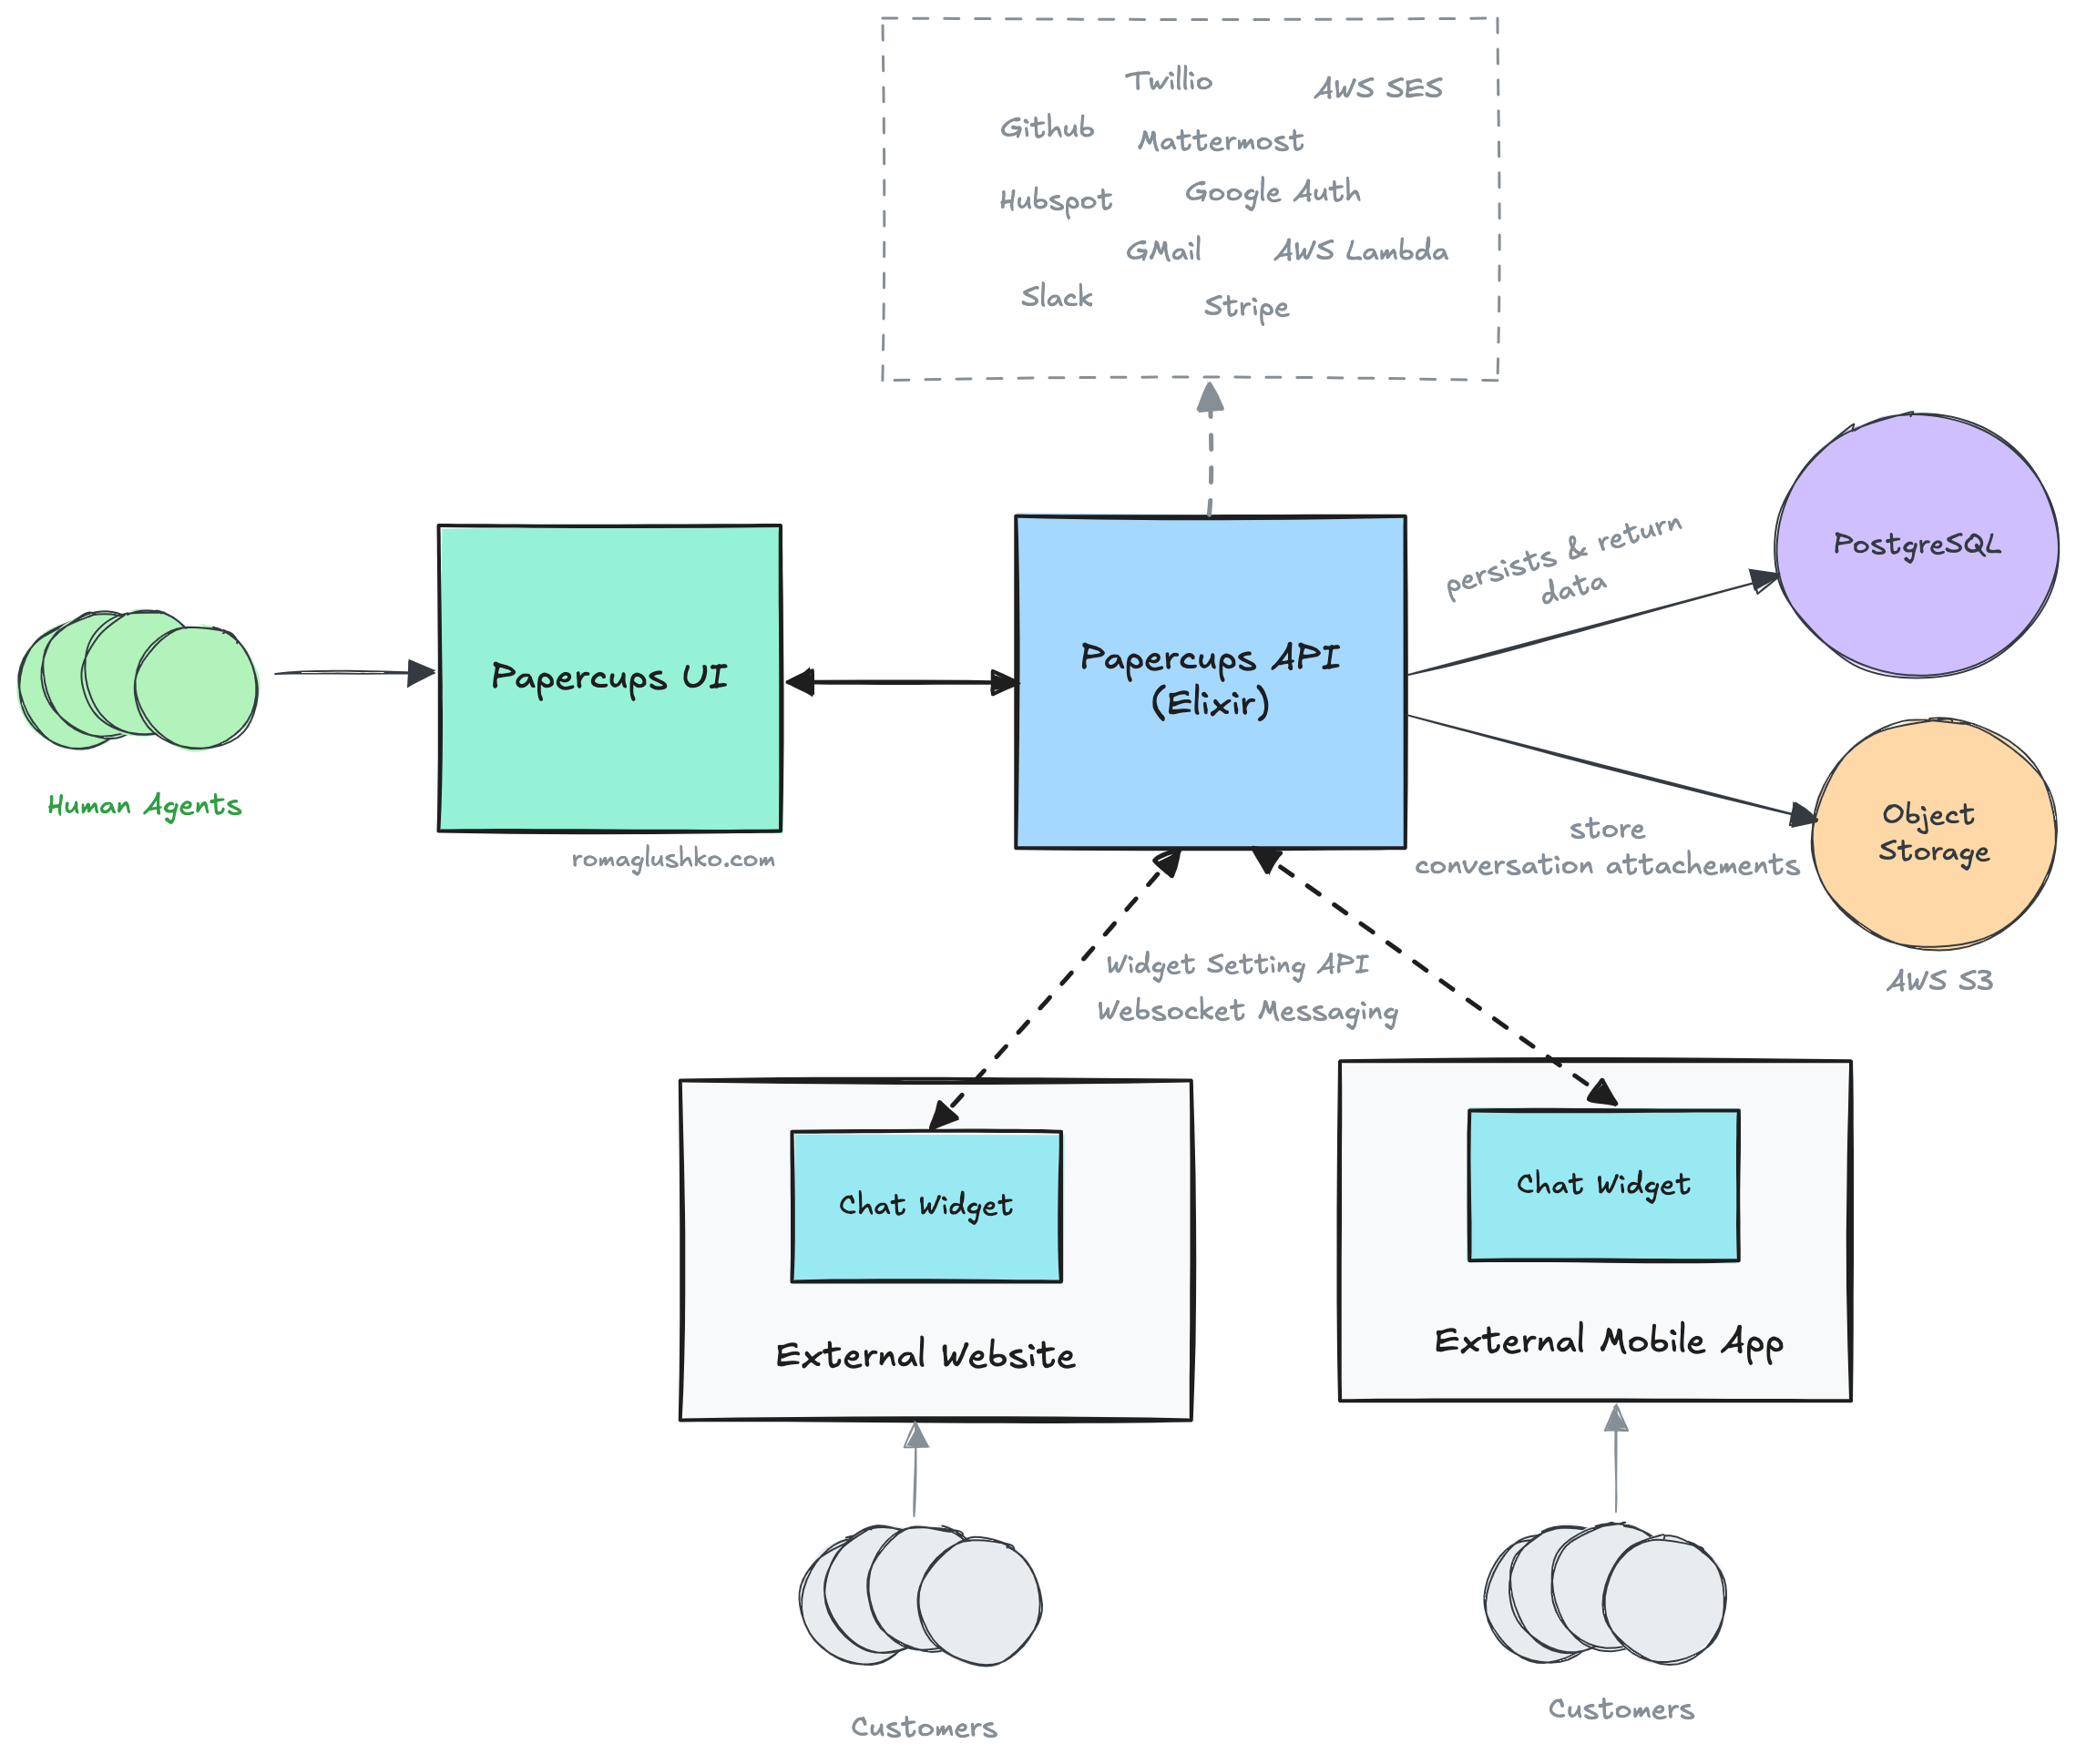
First off, the Papercups API is built with Elixir and Phoenix Framework. Elixir is well-regarded in the communications space, with companies like Discord, PagerDuty, Podium, and others. It’s a functional and very readable language that compiles back to the Erlang’s BEAM virtual machine.
The API is a single monolithic deployment and uses PostgreSQL for data storage, along with an object storage (AWS S3 for file attachments.
Asynchronous background tasks are handled using Oban.
From a UI perspective, we have the Dashboard UI and a special live chat widget that’s designed to be embedded into other websites.
The live chat is powered by Phoenix Channels & Presence.
The architecture seems like a solid choice for a startup project.
Accounts & Users
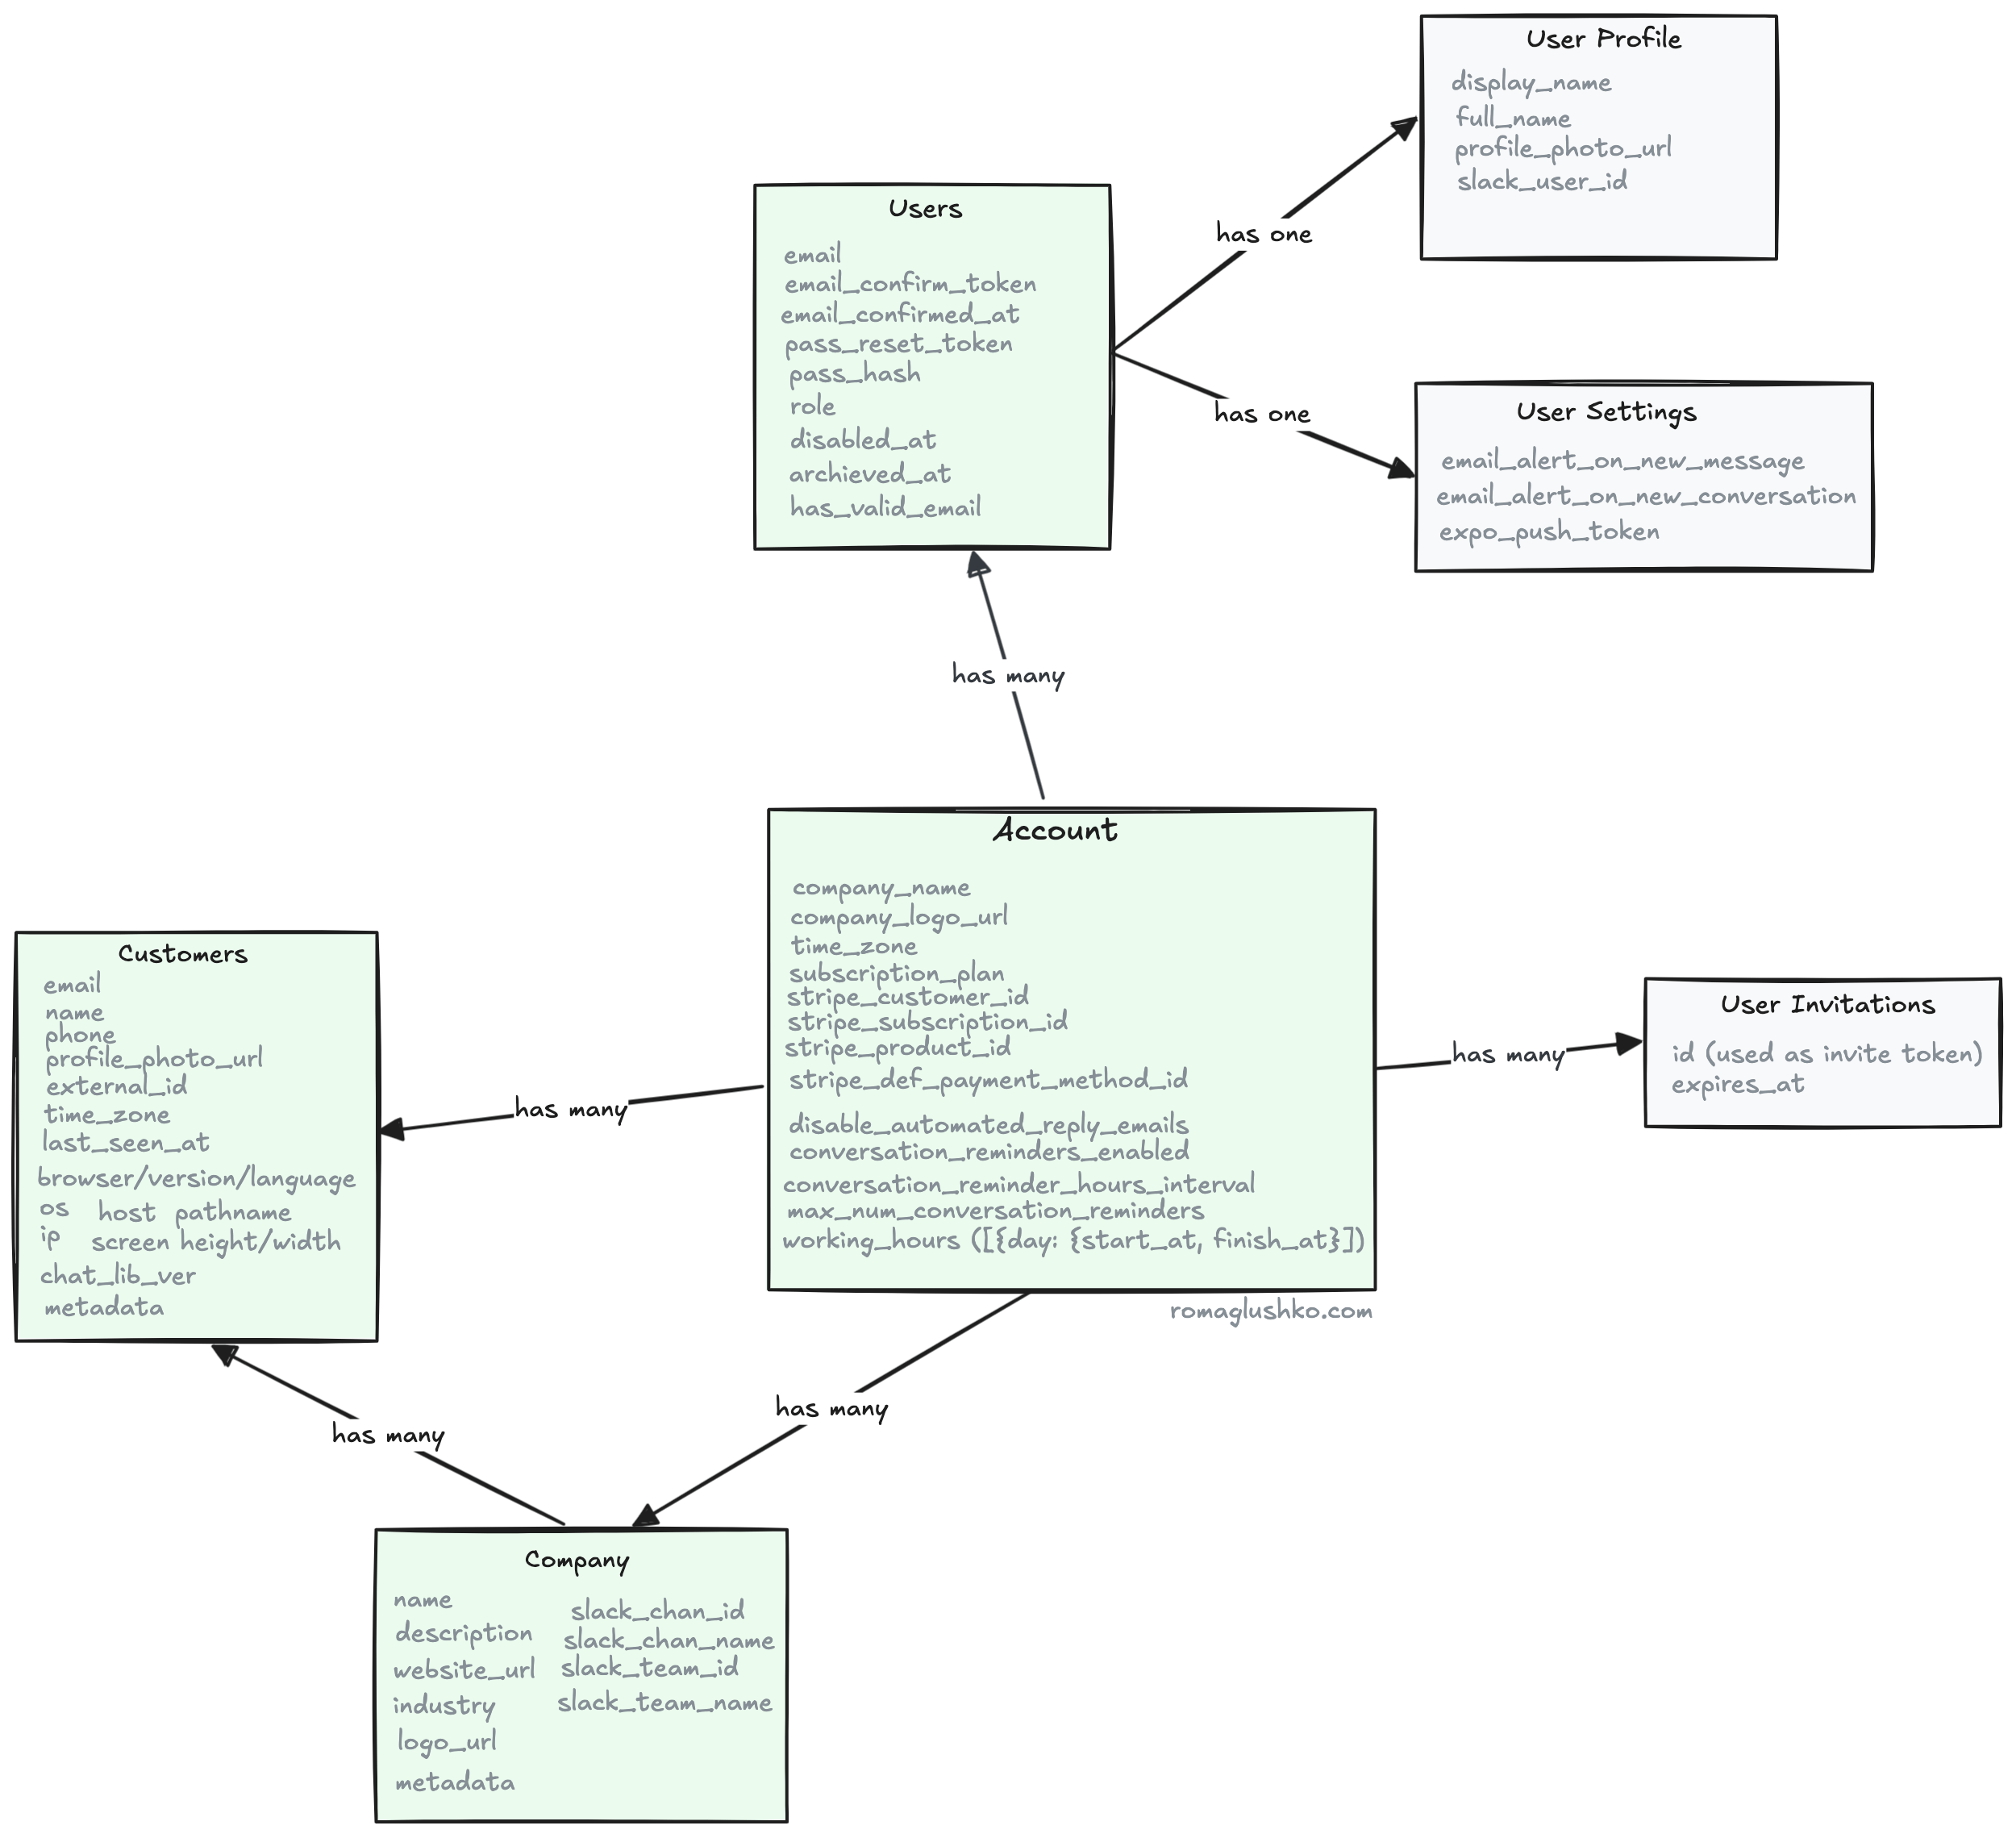
To get a better grasp of what Papercups offers, let’s dive into its data model.
We’ll start with accounts, users and customers models, as they’re key to understanding how everything else connects.
Accounts
The Account is the core entity in the system. It holds billing information
and key details about your company, such as company_name, company_logo_url or working_hours.
Additionally, the Account table includes general limits and settings.
Users
The Account has Users who are employees of the company that serve their Customers.
The User table includes standard information like email, role, pass_hash, and so on.
The information shown when a User is chatting with a Customer is kept in a separate table UserSettings.
Unlike the Accounts table, the Users table doesn’t have any settings. These are stored in the UserSettings table instead.
There are two roles for Users: member and admin.
Admins have more permissions, including the ability to set up integrations.
Users can be invited by generating an invitation link, which is tied to a specific Account.
The link expires either after three days or as soon as a new user is created using it (by setting the expiration time to now).

The main admin who creates a new Account is registered via a separate form.
You can disable this registration path by setting an environment variable called PAPERCUPS_REGISTRATION_DISABLED.
This is handy for on-premises setups where typically only one company uses the Papercups installation.
Customers
Customers are the people served by Account and its Users. Users have conversations with Customers.
The platform tries to create a Customer profile for any new interaction with the system and match the Customer
with all previous interactions to provide a seamless experience.
Over time, Papercups may collect a lot of information about Customers and that may make it feel like a CRM system.
Papercups supports linking its Customer base with Hubspot or Intercom data,
but we are not reviewing that one as it’s implemented as a rather simplistic one-way manual linking.
Billing
Papercups uses a straightforward fixed-price subscription model with three plans billed monthly. These plans differ in terms of user seat limit, message volume, data retention time and some features.
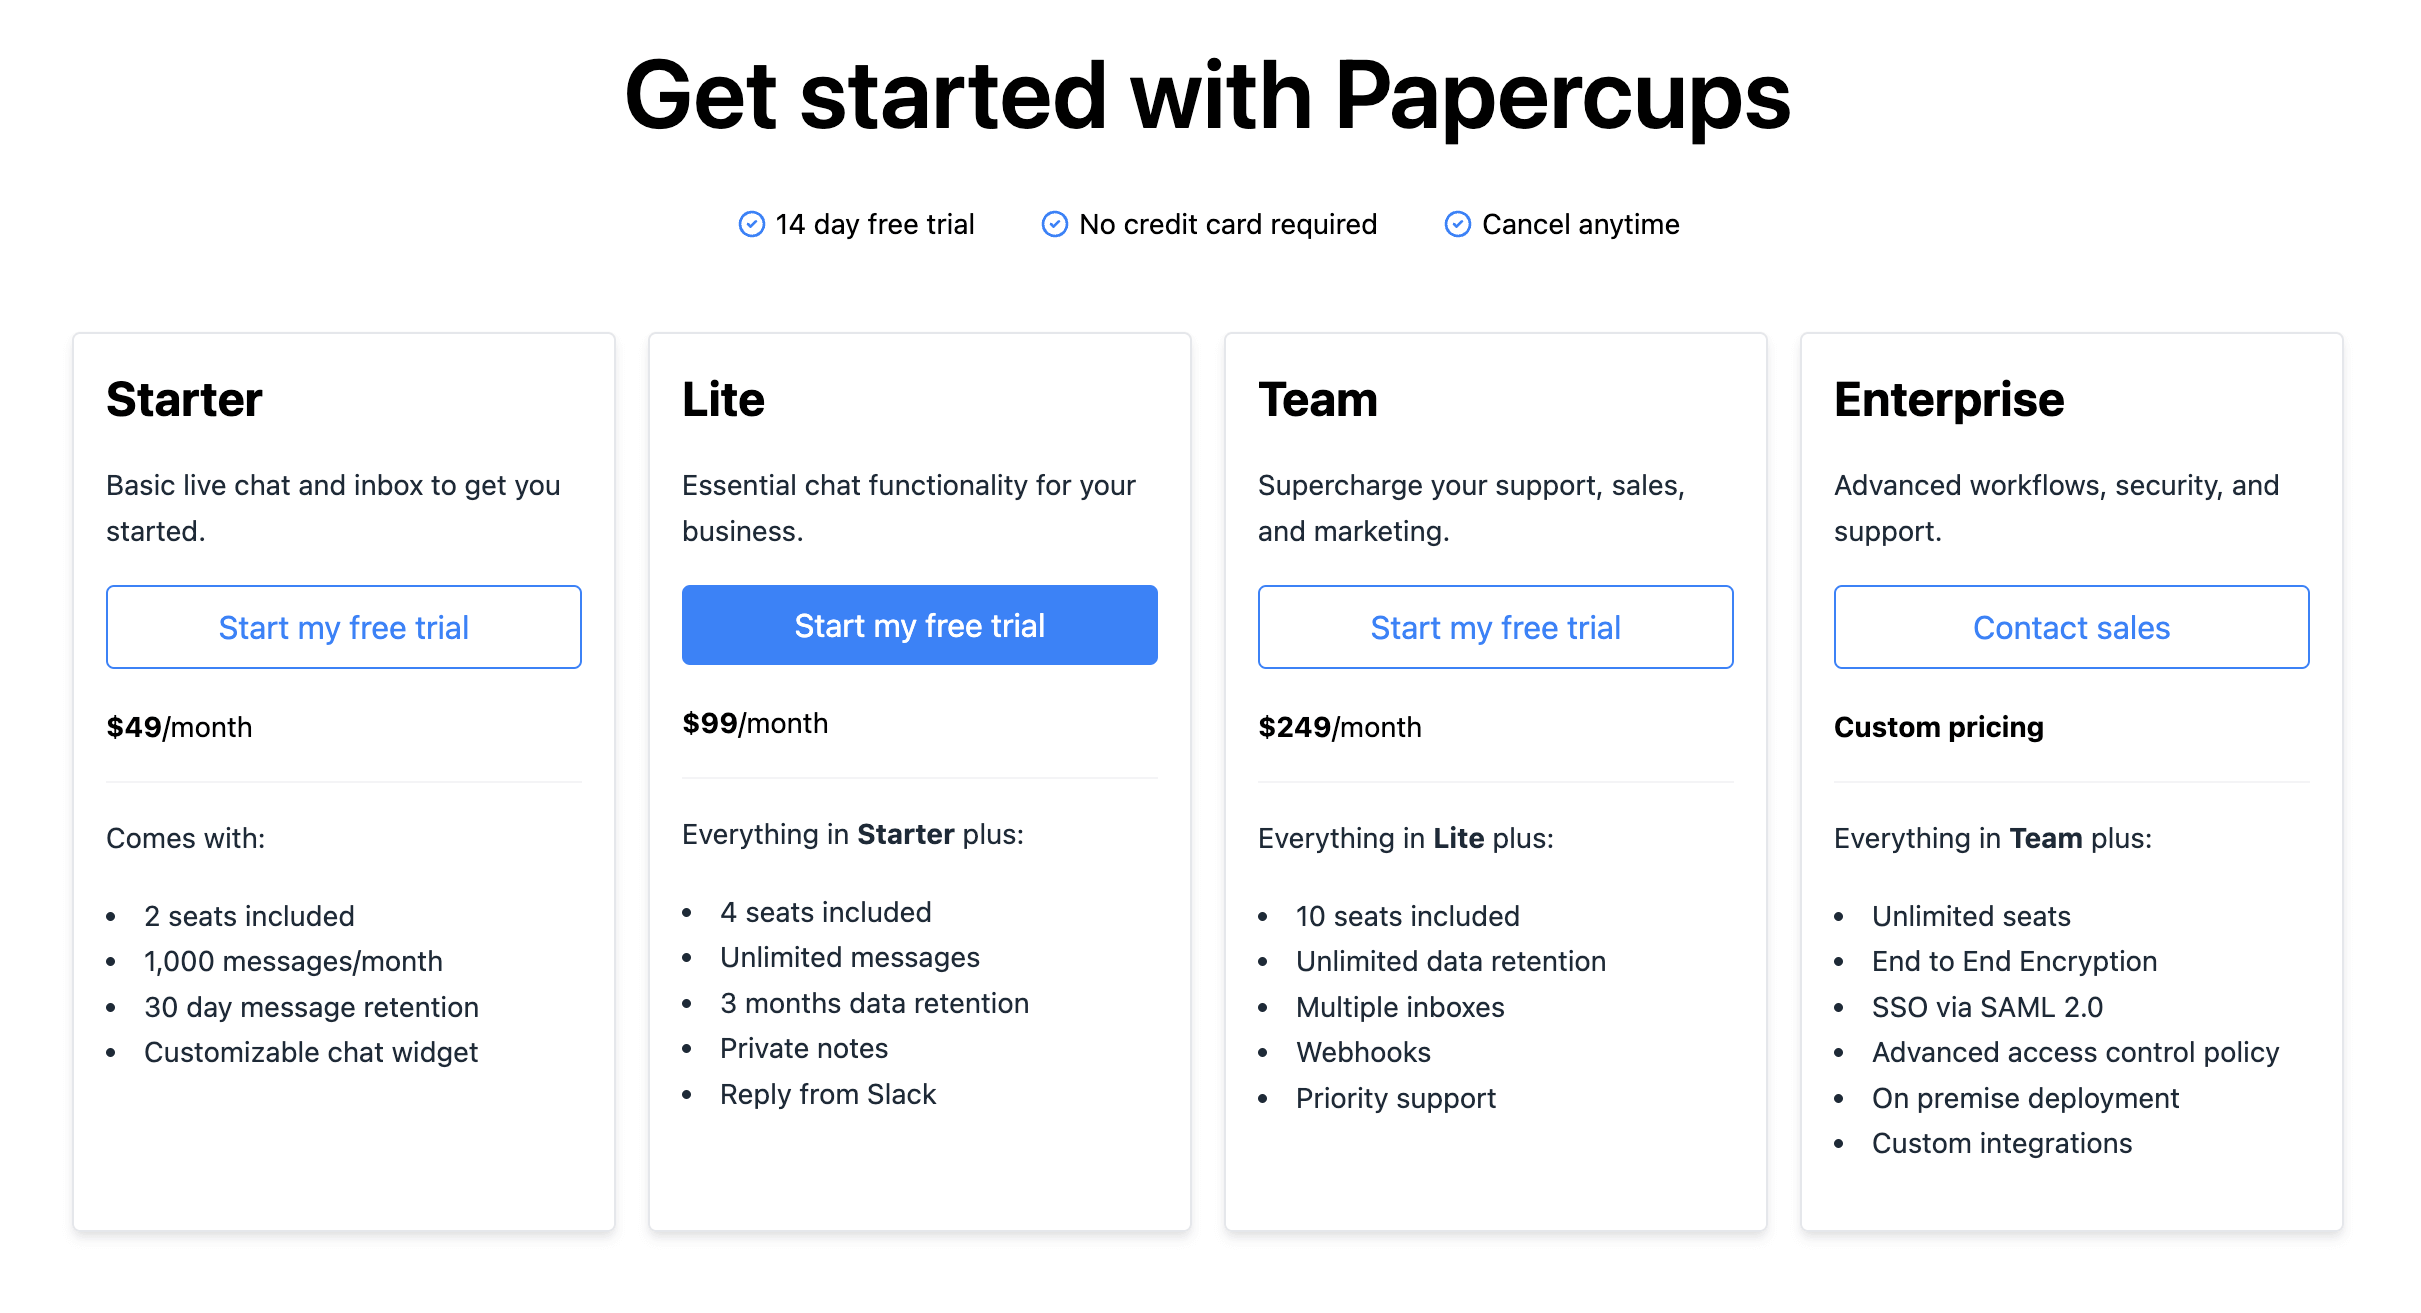
The Account can be one of these plans:
Starter: A free plan that supports up to two users.Lite: A paid plan that supports up to four users.Team: A paid plan with no user limit.
In addition to tracking users, they also monitor the number of messages that pass through the system. However, it looks like this information isn’t used for pricing.
They offer a different set of plans for EU customers, marked with an eu- prefix.
These plans likely include VAT in the pricing and offer a different set of payment options.
Subscriptions
To actually do the billing, Papercups uses Stripe’s Subscriptions.
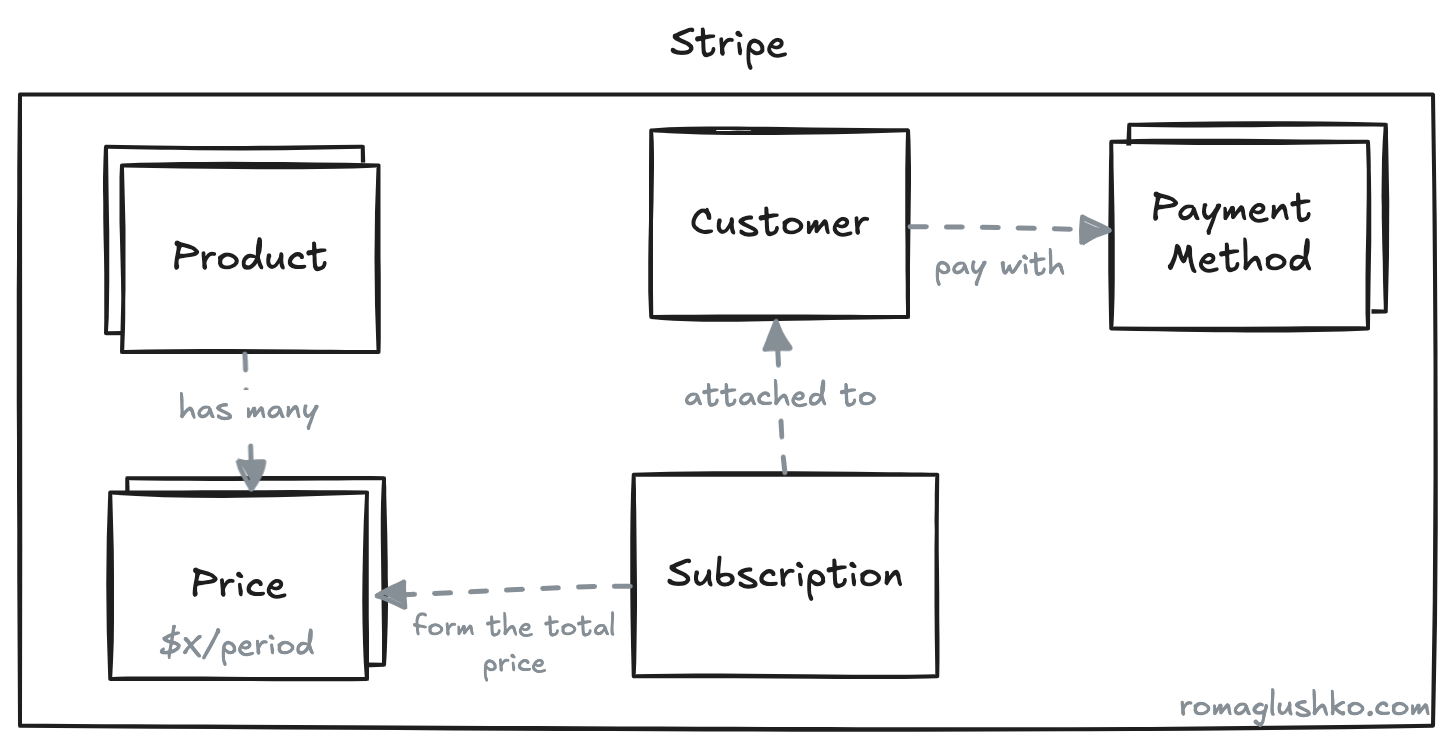
In Stripe there are a few objects that pay together to create a recurring subscription:
Productis essentially our subscription plan e.g.starter,lite,team.Pricecontains information about price, currency and recurring interval. One product may have manyPricesdescribing different billing options like paying once a month or once a year.- Stripe has its own
Customerrepresentation holding the information about the person or a company that receives our invoices. Customershave theirPaymentMethodswhich is the way to pay for the subscription.- Finally,
Subscriptionstie all these objects together and state the subscription agreement.
The subscription is created in the following way:
- Papercups creates a new Stripe Customer if
Accounthas not referenced it yet. It usesemailandcompany_namedata for that. - Then, it allows you to create a new credit card-based
PaymentMethodby filling a form in the Papercups Dashboard UI. ThePaymentMethodgets attached to the StripeCustomerand referenced on theAccountmodel. - After this, the user picks one of the plans and subscribes to it. Under the hood, Papercups fetches the Stripe
Productsto match it with the plan, then fetches allPricesand does aSubscriptioncreation with that information. All plans come with a 14-day free trial (a StripeSubscriptionoption).
On subscription cancellation, Papercups just deletes the previously created subscription and rolls back the plan to starter.
Conversations
Another crucial part of the Papercups system is the Conversation data model.
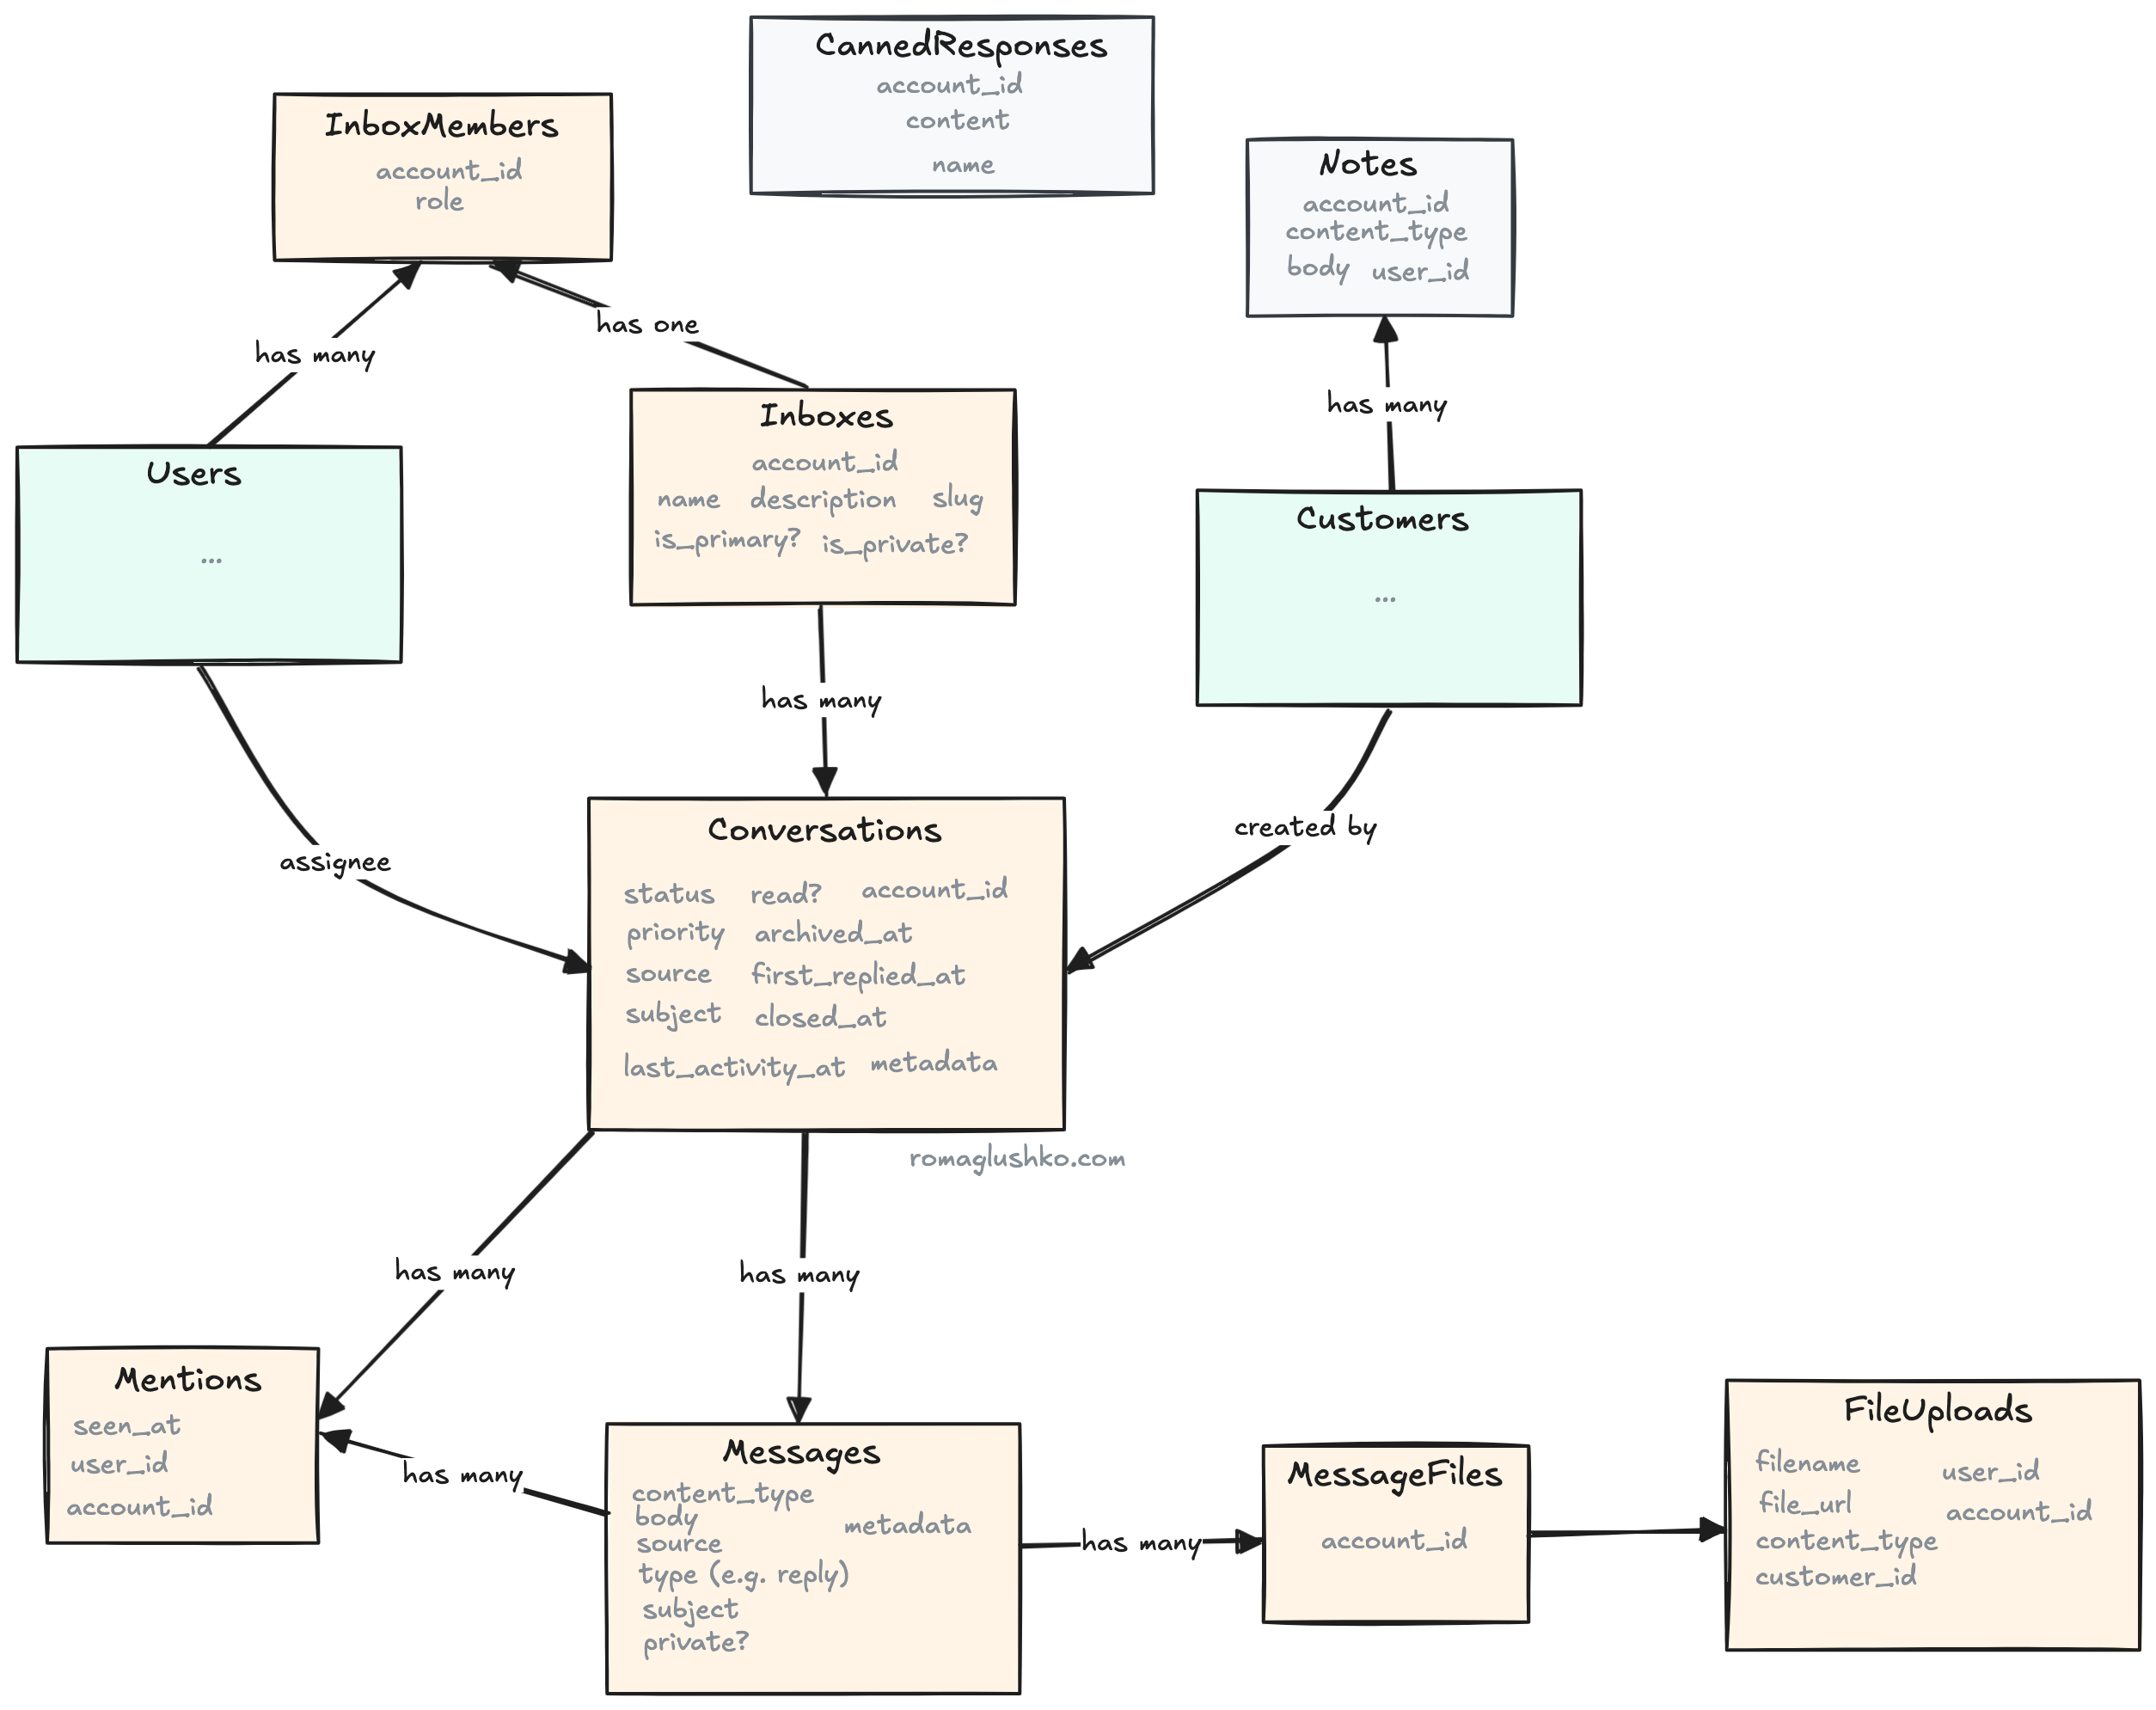
Conversations are made up of Messages. A new Conversation starts with the first Message.
A Conversation can be marked as important or not, and it can be either closed or open.
Papercups tracks when the first reply happens to analyze agents’ response times.
Additionally, the system keeps track of whether and when new Messages are seen by Users and Customers
to show this information in the chat window.
Optionally, Conversations can be tagged with ConversationTags to help with filtering and searching them.
Message Attachments
Papercups lets Customers and Users attach files to their messages during
live chat or email conversations.
Live chat files are uploaded directly from the chat widget.
Papercups has a separate upload API where the widget sends an attachment as multipart form data.
The API uploads the file to the AWS S3 bucket and creates a new FileUpload record
that stores file metadata like the S3 file URL, content type, filename, etc.
The backend returns back the file metadata along with file_id. Finally, the chat widget passes the file_id reference
along with message data to create a new Message record.
The system creates a MessageFile link that attaches the file to the message.
Message Notifications
When a new Message is created, Papercups does a bunch of notifications depending on where the message came from:
- first of all, we notify the
Customerback through the same channel they used to start the conversation which is either email, SMS, GMail, or live chat notification. - broadcast a websocket message to
Accountadmin channel - send a webhook notification to all subscribers
- send a push notification to
Usersvia Expo - send messages to the configured reply channels in Slack or Mattermost
When a new Conversation is created, there are also some notifications:
- broadcasting a websocket message to all
Usersand in theAccount - broadcasting a websocket message to
Customerin the Conversation Lobby Channel - sending a webhook notification to all subscribers
Conversation Reminders
It’s entirely possible that some Conversations may get forgotten or lost in the shuffle.
To help with this, the Account admin can set up a conversation reminder
after a configured number of hours without a reply.
The reminder adds a new private message to the conversation thread that is visible to Users only.
The reminder message is marked in a special way to distinguish it from regular messages.
Its metadata contains is_reminder flag and reminder_count that
is incremented every time a new reminder message is added.
The admin can configure the max number of consequent reminders to give their support team before giving up.
Reminder messages are also broadcasted to Slack, Mattermost, admin users, and webhooks like regular messages.
Sharing Conversations
You can share Conversations with anyone, even if they are outside the system.
Papercups creates a JWT token that includes signed data for account_id and customer_id .
The convesation_id is simply included as a query parameter in the URL. This token is valid for one day.
Here’s what the sharing link looks like:
http://localhost:4000/share?cid=6b5d64ae-6c6a-46de-b672-550cc204ee94&token=SFMyNTY.g2gDaAJtAAAAJDBk...http://localhost:4000/share?cid=6b5d64ae-6c6a-46de-b672-550cc204ee94&token=SFMyNTY.g2gDaAJtAAAAJDBk...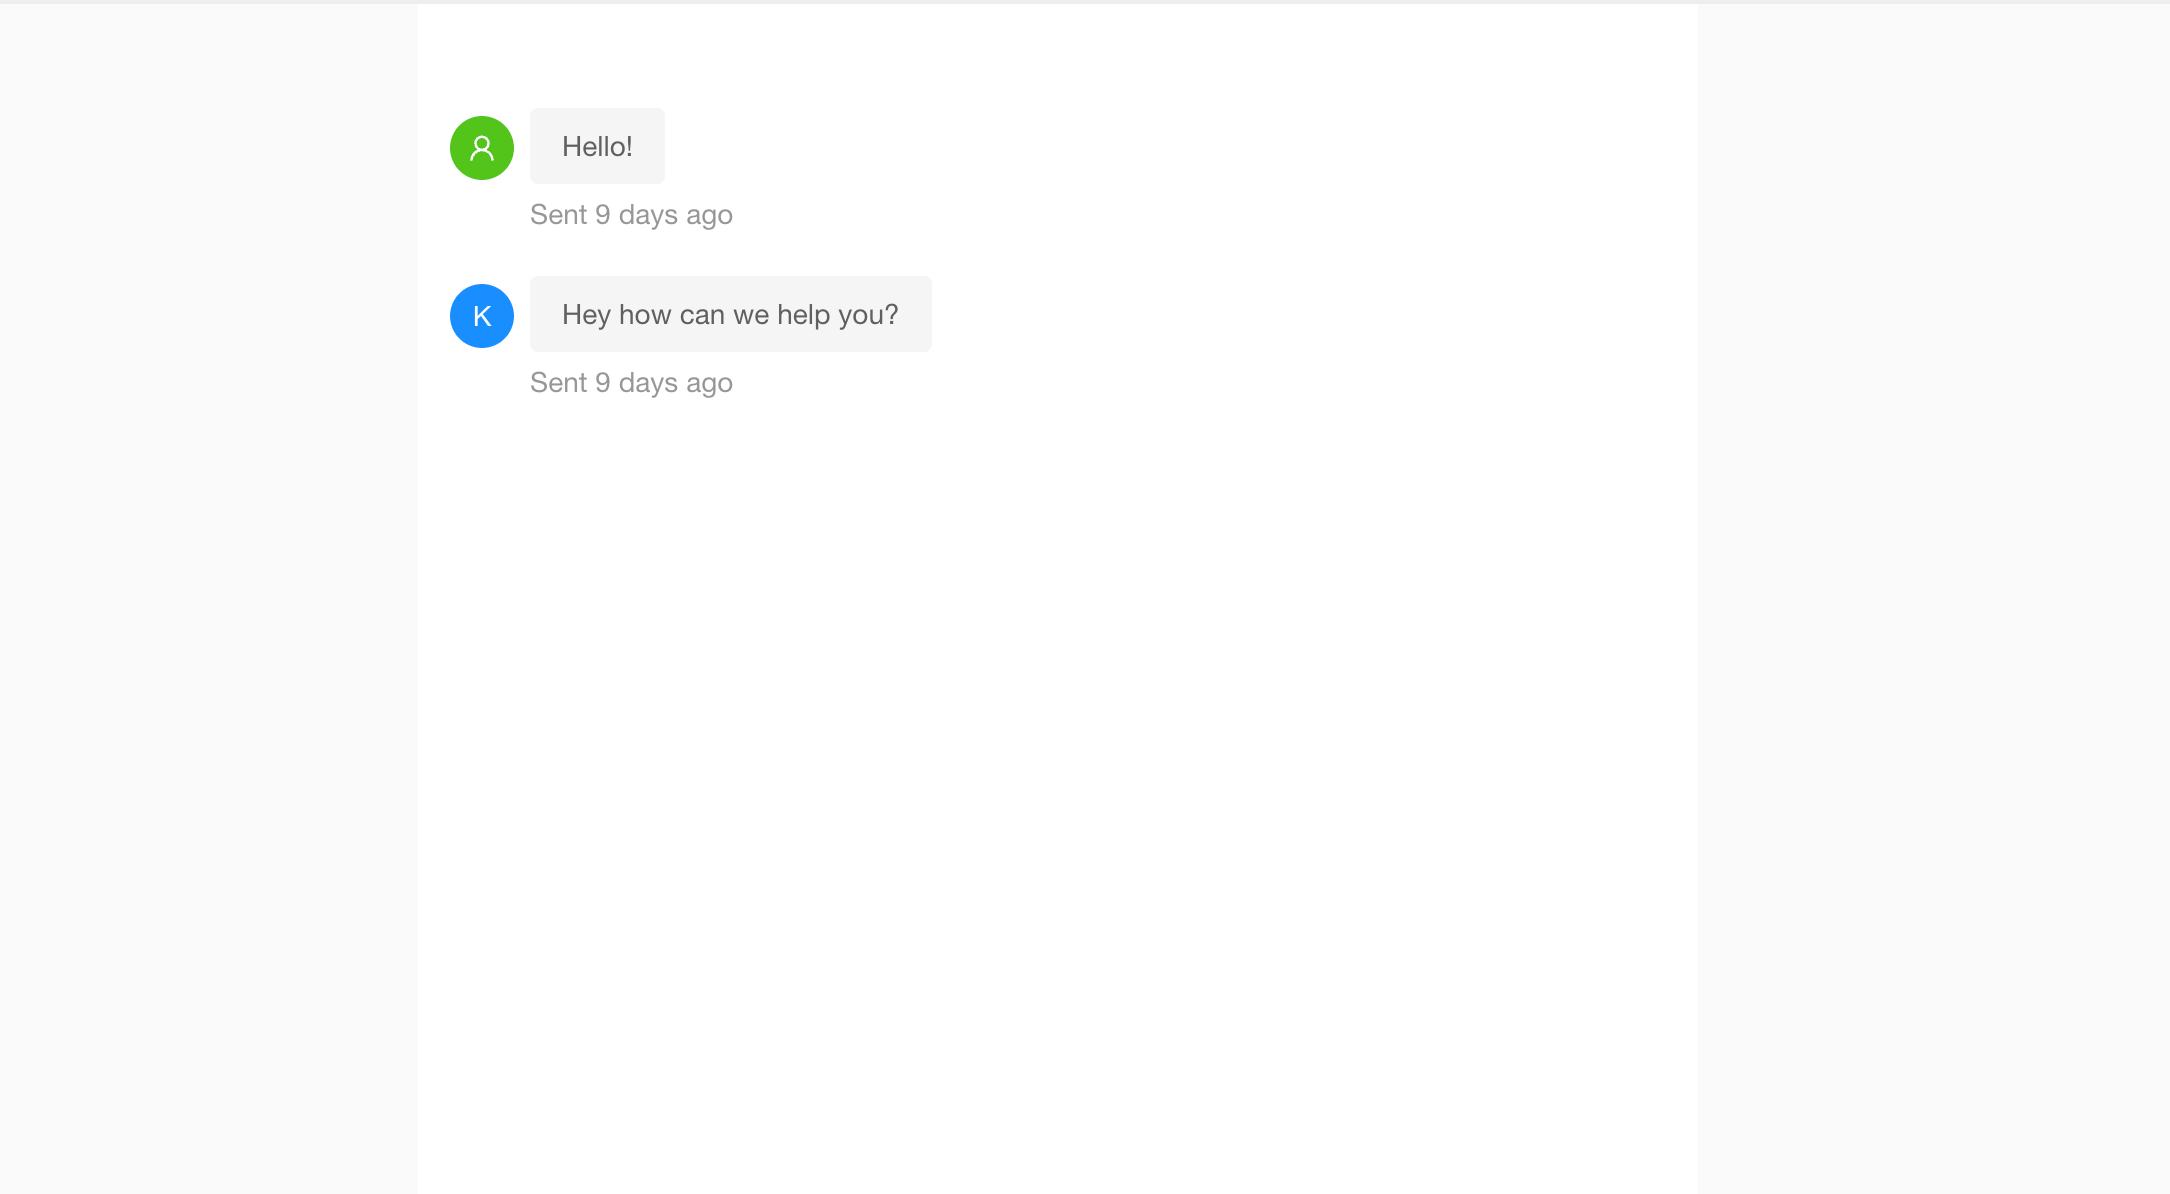
The shared conversation is rendered as a read-only conversation thread.
Notes & Canned Responses
Users can assign multiple Notes to their Customers,
adding private information that’s only visible to human agents.
Another handy feature is canned responses. These are predefined reply snippets you can quickly insert into your current message, making typing a breeze.
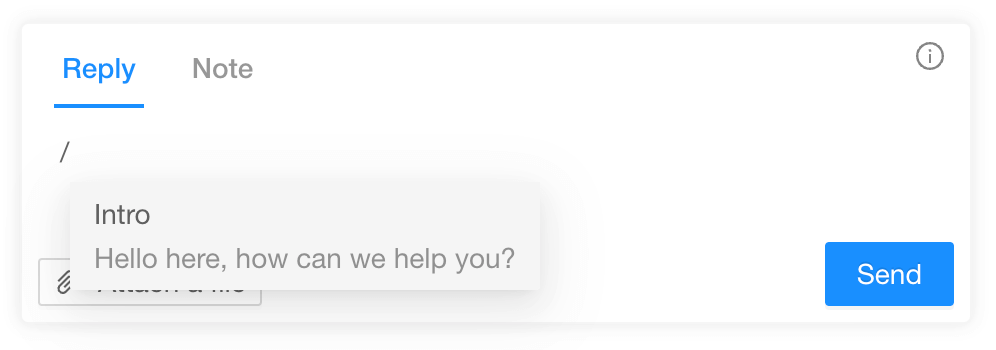
Saved replies have short identifiers, like /into, that are used to look them up.
The UI loads all the canned responses where the reply textbox appears and
then suggests the appropriate reply when someone types /.
Archiving Conversations
Over time, the number of Conversations can grow significantly.
To keep the system performant and responsive, Papercups archives certain stale Conversations.
For paid Accounts, the system automatically archives all closed Conversations that are 2 weeks old.
For free starter Accounts, it archives all non-important Conversations that were inactive for a month.
After archiving, conversations are not available in the Papercups Dashboard and are not included anywhere else in the platform.
Inboxes
Papercups makes it easy to start a conversation with a customer through various channels like email, SMS, Slack, live chat widgets, and Gmail.
All messages from these sources are collected into one or a few Inboxes.
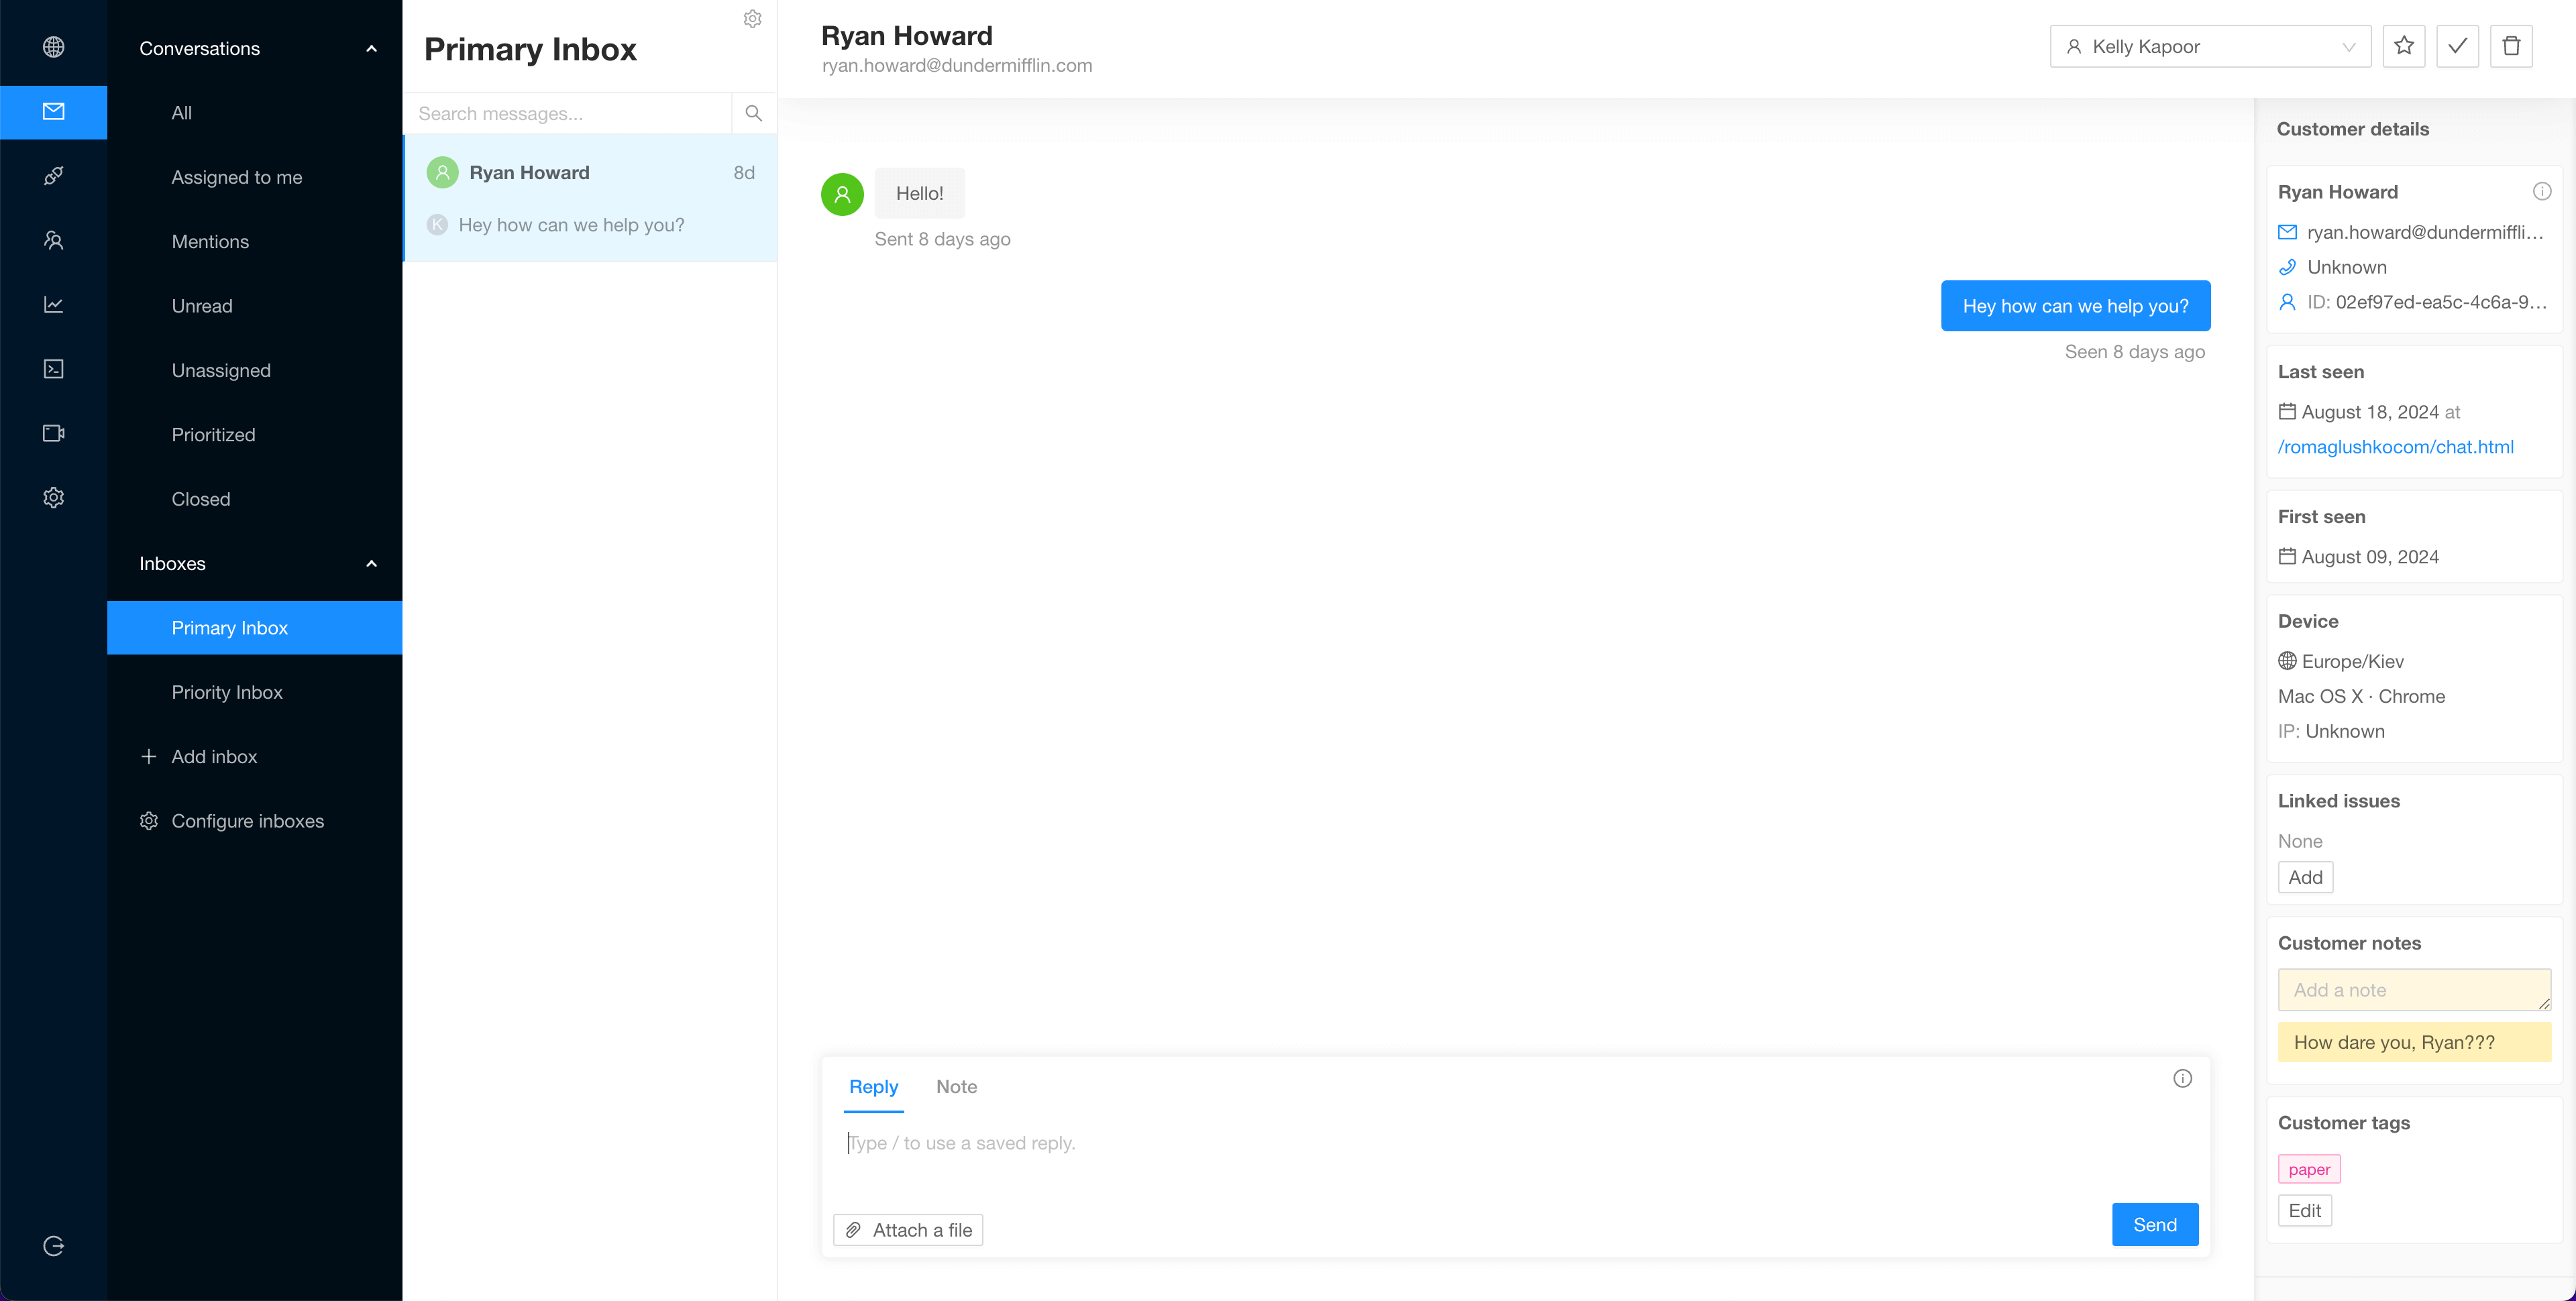
Inbox is an abstraction around the communication channels and a way to group your conversations by sources,
so all conversations coming into one Inbox look like they were coming from one and the same channel.
To play this abstraction game til the end, Papercups replies back seamlessly via the channel the conversation was started initially, so
Users have to deal with the chat UX no matter how the conversation has landed on the platform.
The InboxMembers is the way to subscribe Users to the corresponding notifications about new messages in the Inbox
(doesn’t seem to be fully implemented in Papercups though).
Email Forwarding
Receiving emails is implemented via AWS Simple Email Service (SES).
First off, you would need to generate a unique forwarding email associated with your specific Inbox.
The forwarding email is generated at a specific domain that is verified in AWS SES and linked to SES’s email servers via MX records.
Then, you likely need to point your customer-facing email (e.g. support@acme.com) to the forwarding one. This is a common functionality that domain registrars provide. Gmail supports this natively too via their account settings.

Once someone sends an email to the customer-facing email, it gets forwarded all the way to the AWS SES.
Upon receiving an email, SES dumps it as a file into the S3 bucket under the unique message_id
which is then passed over in the webhook payload. This includes email attachment files, too.
Finally, SES sends a webhook call to Papercups API with message_id, from and to email addresses along with
the Received header that contains additional information about email routing path.
Email Format
There is RFC2822 that defines the email file format that SES uses to share emails with their client applications.
It may be worth pausing for a second to look at raw email format.
The email format is awfully close to the HTTP request/response format.
There is a header with a list of well-defined and custom fields (prefixed by X- just like in the HTTP convention) and
a body that holds the actual email content.
Here is a list of common email header fields:
Sender Fields
From- The email address of the sender. It can be a list of addresses then a separateSenderfield has to be set toReply-To- an optional field that specifies the email addresses to which replies should be sent by default. Normally,Fromis used for that.
Receiver Fields
To- a list of email addresses that the email is sent to. There are primary recipients.Cc- a list of email addresses that receive the email, and it’s not directed to them (a.k.a. carbon copies).Bcc- a list of email addresses that receive the message but don’t have to be revealed to other participants (a.k.a. blind carbon copies).
Identification Fields
Message-IDis a unique identifier for the email generated by the email clientIn-Reply-Tocontains aMessage-IDof the email that this email is a reply toReferencesis a conversation history in the form of a list of previousMessage-IDs up to this reply
Info Fields
Subject- the subject of the email threadReceived- a list of email servers that the email has passed through. It’s a good way to track the email routing path.
Here is an example of a raw email:
From: "Dwight Shrut" <dwight.shrut@dundermifflin.com>
To: michael.scott@dundermifflin.com
Subject: Another prank
Message-ID: <CAEkJ+_b2Y4bu6gn-xp3aM+ujD8An9mNq9WzwvtrMWoDQBYZW4Q@mail.gmail.com>
Received: from 52669349336 named unknown by gmailapi.google.com with HTTPREST; Fri, 2 Aug 2024 04:32:44 -0700
Received: from mail-sor-f65.google.com (mail-sor-f65.google.com. [209.85.220.65])
        by mx.google.com with SMTPS id 00721157ae682-68a10658756sor13094707b3.5.2024.08.02.04.32.45
        for <michael.scott@dundermifflin.com>
        (Google Transport Security);
        Fri, 02 Aug 2024 04:32:46 -0700 (PDT)Date: Fri, 2 Aug 2024 04:32:44 -0700
MIME-Version: 1.0
Content-Type: multipart/alternative; boundary="000000000000a7bf26061eb1af2b"
--000000000000a7bf26061eb1af2b
Content-Type: text/plain; charset="UTF-8"
Content-Transfer-Encoding: quoted-printable

Michael, Jim put put my stuff in jello again!
Can you please punish him?

--000000000000a7bf26061eb1af2b
Content-Type: text/html; charset="UTF-8"

<div dir=3D"ltr">Michael, Jim put put my stuff in jello again!<br/>
<div>Can you please punish him?</div>
</div>

--000000000000a7bf26061eb1af2b--
From: "Dwight Shrut" <dwight.shrut@dundermifflin.com>
To: michael.scott@dundermifflin.com
Subject: Another prank
Message-ID: <CAEkJ+_b2Y4bu6gn-xp3aM+ujD8An9mNq9WzwvtrMWoDQBYZW4Q@mail.gmail.com>
Received: from 52669349336 named unknown by gmailapi.google.com with HTTPREST; Fri, 2 Aug 2024 04:32:44 -0700
Received: from mail-sor-f65.google.com (mail-sor-f65.google.com. [209.85.220.65])
by mx.google.com with SMTPS id 00721157ae682-68a10658756sor13094707b3.5.2024.08.02.04.32.45
for <michael.scott@dundermifflin.com>
(Google Transport Security);
Fri, 02 Aug 2024 04:32:46 -0700 (PDT)Date: Fri, 2 Aug 2024 04:32:44 -0700
MIME-Version: 1.0
Content-Type: multipart/alternative; boundary="000000000000a7bf26061eb1af2b"
--000000000000a7bf26061eb1af2b
Content-Type: text/plain; charset="UTF-8"
Content-Transfer-Encoding: quoted-printable
Michael, Jim put put my stuff in jello again!
Can you please punish him?
--000000000000a7bf26061eb1af2b
Content-Type: text/html; charset="UTF-8"
<div dir=3D"ltr">Michael, Jim put put my stuff in jello again!<br/>
<div>Can you please punish him?</div>
</div>
--000000000000a7bf26061eb1af2b--Conversation Matching
At this point, Papercups has only a reference to the received email and a bunch of email addresses associated with it. Papercups doesn’t do the webhook processing immediately, but rather add a new task to the distributed queue.
The task worker pulls the email file from the S3 bucket first, creates a new conversation or a message based on the email, and attaches any email files to the message including preloading them to the attachment bucket for permanent storage.
Users are assumed to be replying via the system, so the only person who can email us is the Customer.
Hence, the From email address is used to find or create a Customer.
When User replies to an existing email thread via the system, the reply email is formed in a specific way:
- The system puts a generic email e.g.
{User.name} <mailer@chat.papercups.iointo theFromheader. TheFromemail is still under the domain linked with AWS SES, so we will receive any replies to it. - Papercups makes use of the
Reply-Toheader and sets it toreply+{conversationID}@chat.papercups.iowhich means that this is the default reply email in email clients (unlessCustomerchanges the corresponding field).
After that, Papercups just tries to find if there is any mention of the reply+ email address among all places
and if so, we are dealing with a reply to an existing Conversation.
Gmail Sync
Besides the ability to forward Gmail emails, Papercups can also sync your Gmail messages.
To attain that, Users need to authorization Papercups to work with their Gmail account.
Google supports the OAuth2 Authorization Code workflow specifically for that.
The system requests the gmail.modify scope and
the offline access mode to indicate that
it’s going to be used with further Users involvements to power background syncs.
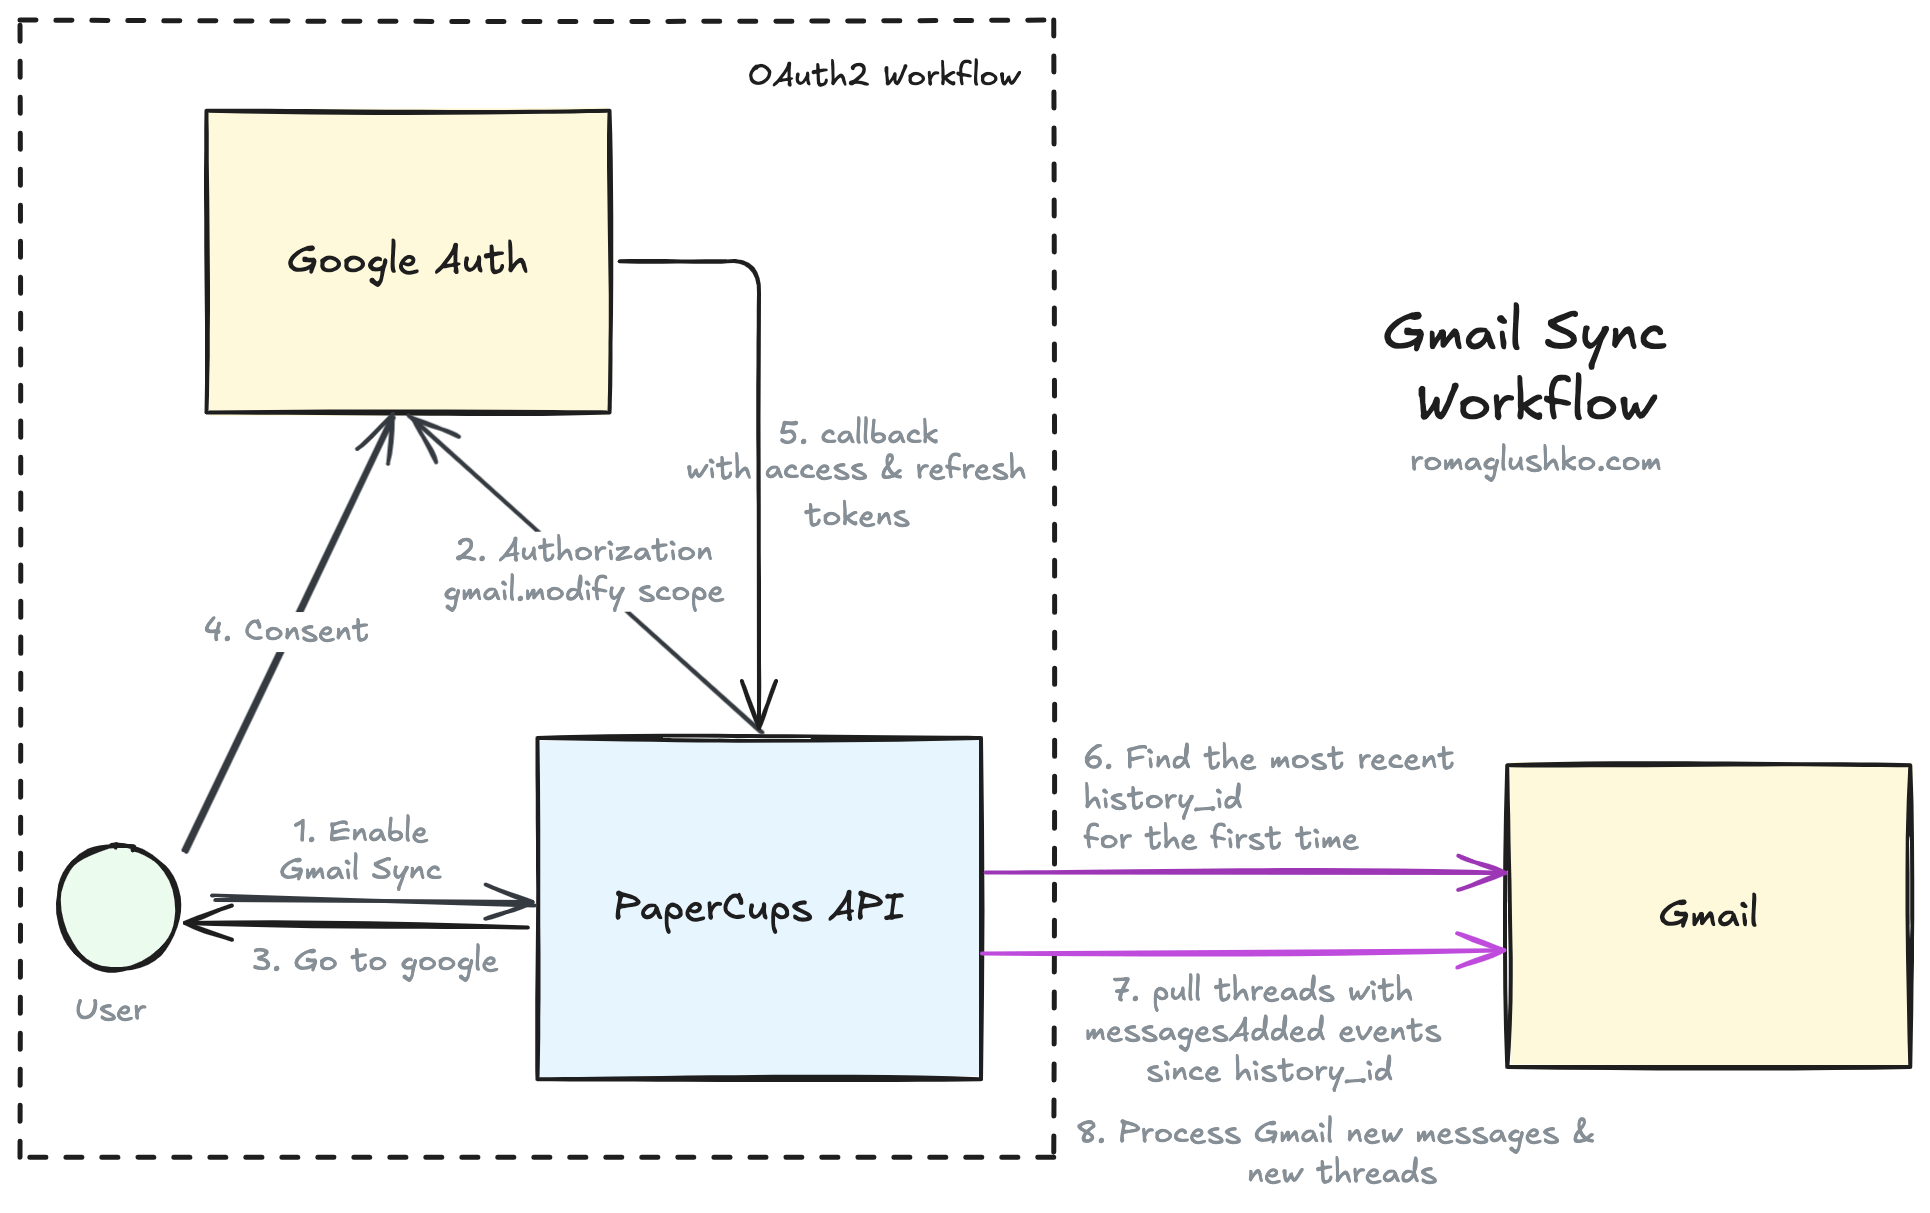
At the end of the authorization workflow e.g. the callback stage, Papercups does the access token request and
persists the receives information like refresh_token, scope, client_type
and of course it links the authorization to a specific Account, Inbox, and User.
Then Papercups triggers a specific background task to enable message syncing.
That process fetches the list of the most recent Gmail threads and identifies where we are in the Gmail history stream
by extracting the history_id from the most recently updated thread.
The history_id points to a place in the Gmail history stream from where we should start pulling updates.
This is a good way to incrementally synchronize data between systems without repulling the whole thread collection every time.
That’s why Papercups saves the history_id until the next sync attempt as metadata on the GoogleAuthorization table.
Unlike the email forwarding and SMS workflows where the system was pinged by webhooks, Gmail sync is based on the pull model, so we need to periodically check out if there are any updates.
When pulling updates, Papercups fetches all history items of the messageAdded type. Messages that were labeled as
spam, draft, promotions are filtered out. If the whole Gmail thread is filled with these messages, it’s skipped.
Then, the system processes the remaining Gmail messages
thread by thread. Papercups maintains Gmail thread metadata in a separate GmailConversationThread table that is linked
with the main Conversation entity.
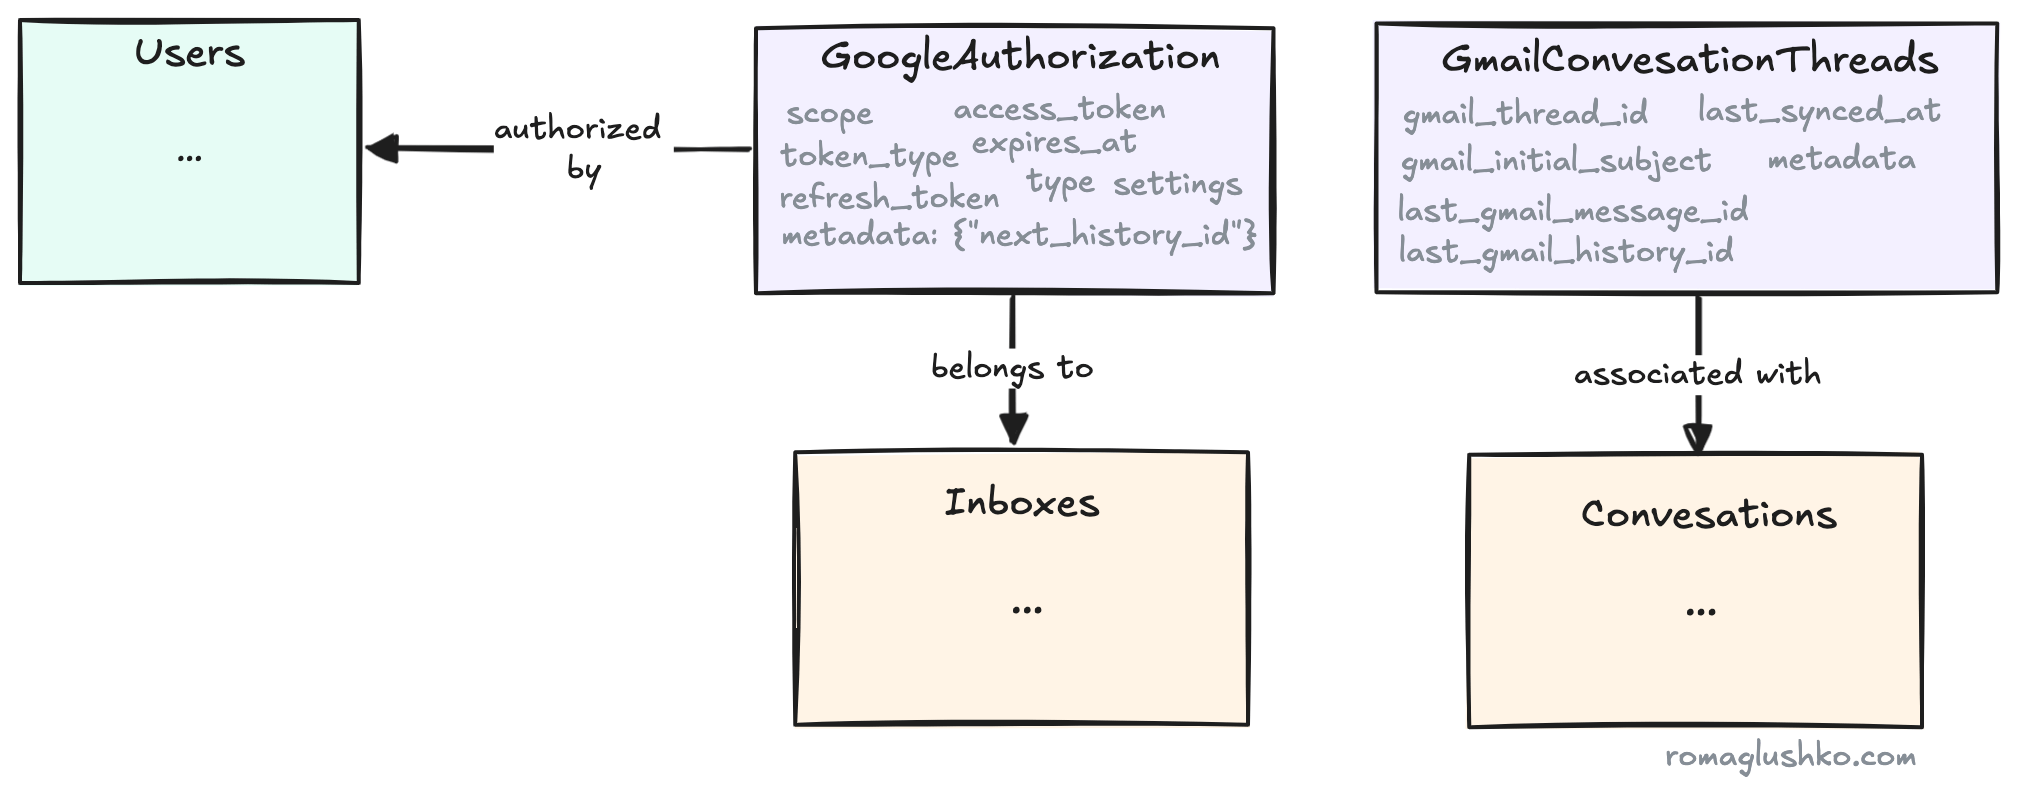
If the Gmail thread is already known to the system, Papercups just loads all existing Conversation messages,
collects gmail_id from their metadata and adds only messages with new gmail_ids.
For the new GMail thread, Papercups creates a new Conversation and links a new GmailConversationThread to it.
Papercups uses the first message in the thread to understand how the thread was created.
If the message contains the SENT label,
then the from email address is the User email and the to email address is the Customer email.
If no Users is found under the email address, Papercups uses the User that has enabled the Gmail sync.
Finally, Papercups adds new Conversation messages based on GMail messages.
It copies a lot of metadata as is from the Gmail message like gmail_id, gmail_message_id, gmail_thread_id
gmail_history_id, gmail_label_ids, and various email headers like FROM, TO, BCC, References, In-Reply-To, etc.
As a part of message creation, we also reupload the GMail attachments to our object storage.
SMS
The platform can use SMS as a conversation source as well. For that, it uses Twilio SMS Receiving Service.
Twilio gives you a phone number, Twilio Account SID and Auth Token that you set in Papercups. Along with that, you need to set a webhook URL in Twilio to point to the Papercups backend. Papercups validates the credentials by simply hitting the Twilio List Messages API endpoint.
Once a new SMS is received, Twilio sends a webhook request with Twilio Account SID, message body, from and to phone numbers.
Just like with emails, the from phone number serves as an identifier of the Customer.
The Twilio Account SID and the to phone number are used to match the integration that contains references to the Account and Inbox.
In the context of SMS conversations, we still have absolutely the same problem of identifying whether this specific message is a part of the existing conversation or a new one.
However, SMS communication has even less flexibility for conversation linking, Papercups has to basically guess
based on the existing data like the Customer, conversation source, Inbox.
So it pulls the last active conversations based on these criteria and assumes it to be the one associated with the given SMS.
Live Chat Widget
One of the most interesting conversation sources is the live chat embedded directly on a website (or a mobile application, but we will focus on the website case here).
Widget Initialization
The live chat widget is inited in two steps.
- Papercups introduces a new window field
Papercupswith the widget configuration. The configuration includes the connection information, look & feel configs, and a few configurations that control the widget behavior (e.g. show agent availability, require email to start a conversation, open the chat window on widget load or not, etc.). - Then, we load the embedded widget script itself in a deferred asynchronous way (not to block anything important).
<script>
    window.Papercups = {
        config: {
            token: "<ACCOUNT_ID>",
            inbox: "<INBOX_ID>",
            title: "Welcome to DunderMifflin",
            subtitle: "Ask us anything in the chat window below",
            primaryColor: "#7bdcb5",
            showAgentAvailability: true,
            requireEmailUpfront: true,
        },
    };
</script>

<script
    type="text/javascript"
    async
    defer
    src="http://app.papercups.io/widget.js"
></script><script>
window.Papercups = {
config: {
token: "<ACCOUNT_ID>",
inbox: "<INBOX_ID>",
title: "Welcome to DunderMifflin",
subtitle: "Ask us anything in the chat window below",
primaryColor: "#7bdcb5",
showAgentAvailability: true,
requireEmailUpfront: true,
},
};
</script>
<script
type="text/javascript"
async
defer
src="http://app.papercups.io/widget.js"
></script>The widget script uses the window.Papercups configuration to render the chat toggle button and the chat window.
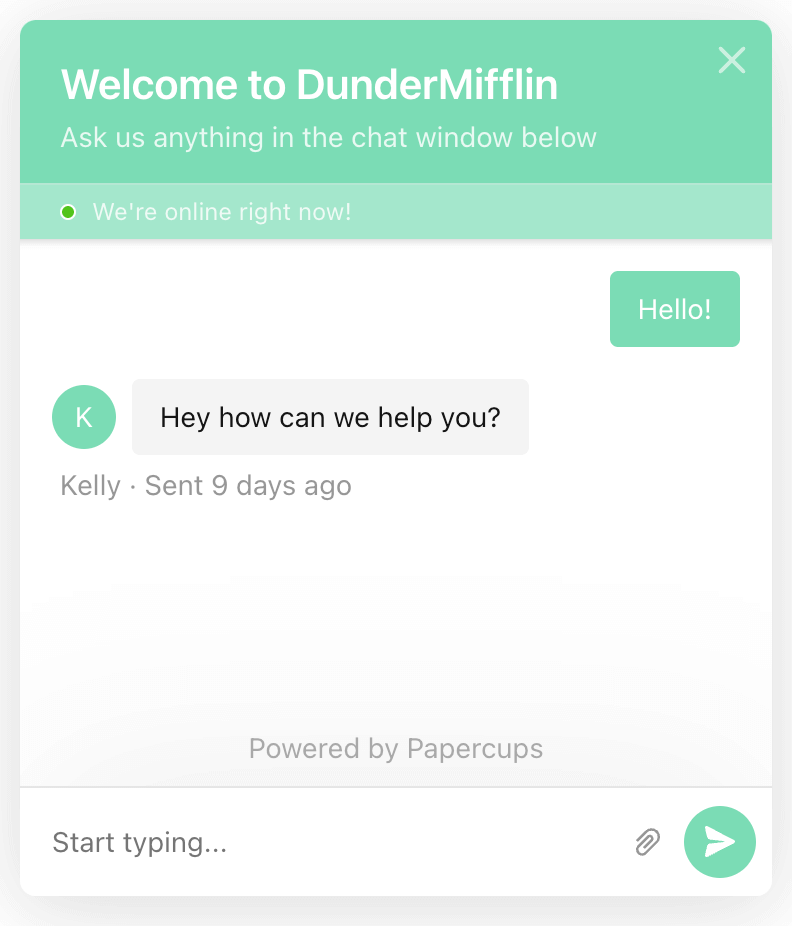
Additionally, the widget script exposes open(), close() and toggle() functions to show or hide the chat window from the external code.
Papercups leverages custom events (e.g. papercups:open) under the hood in the methods to let external scripts to trigger the corresponding actions.
Architecturally, the chat widget has three parts:
- A shared library called
Papercups/Browser. The library contains a set of methods to interact with Papercups REST and websocket API, and a singleton “brain” object to control the conversation logic. - An embeddable ReactJS application that renders the chat toggle and the iframe. It normally is bundled as a UMD module with some auto-rendering logic on initialization (in our case, the logic renders a chat toggle button on the left or right of the page based on the provided configuration). The chat widget is also designed to be installed as a regular NPM package in case you want to import it into your ReactJS project directly.
- A standalone ReactJS application rendered as a chat window in the iframe.
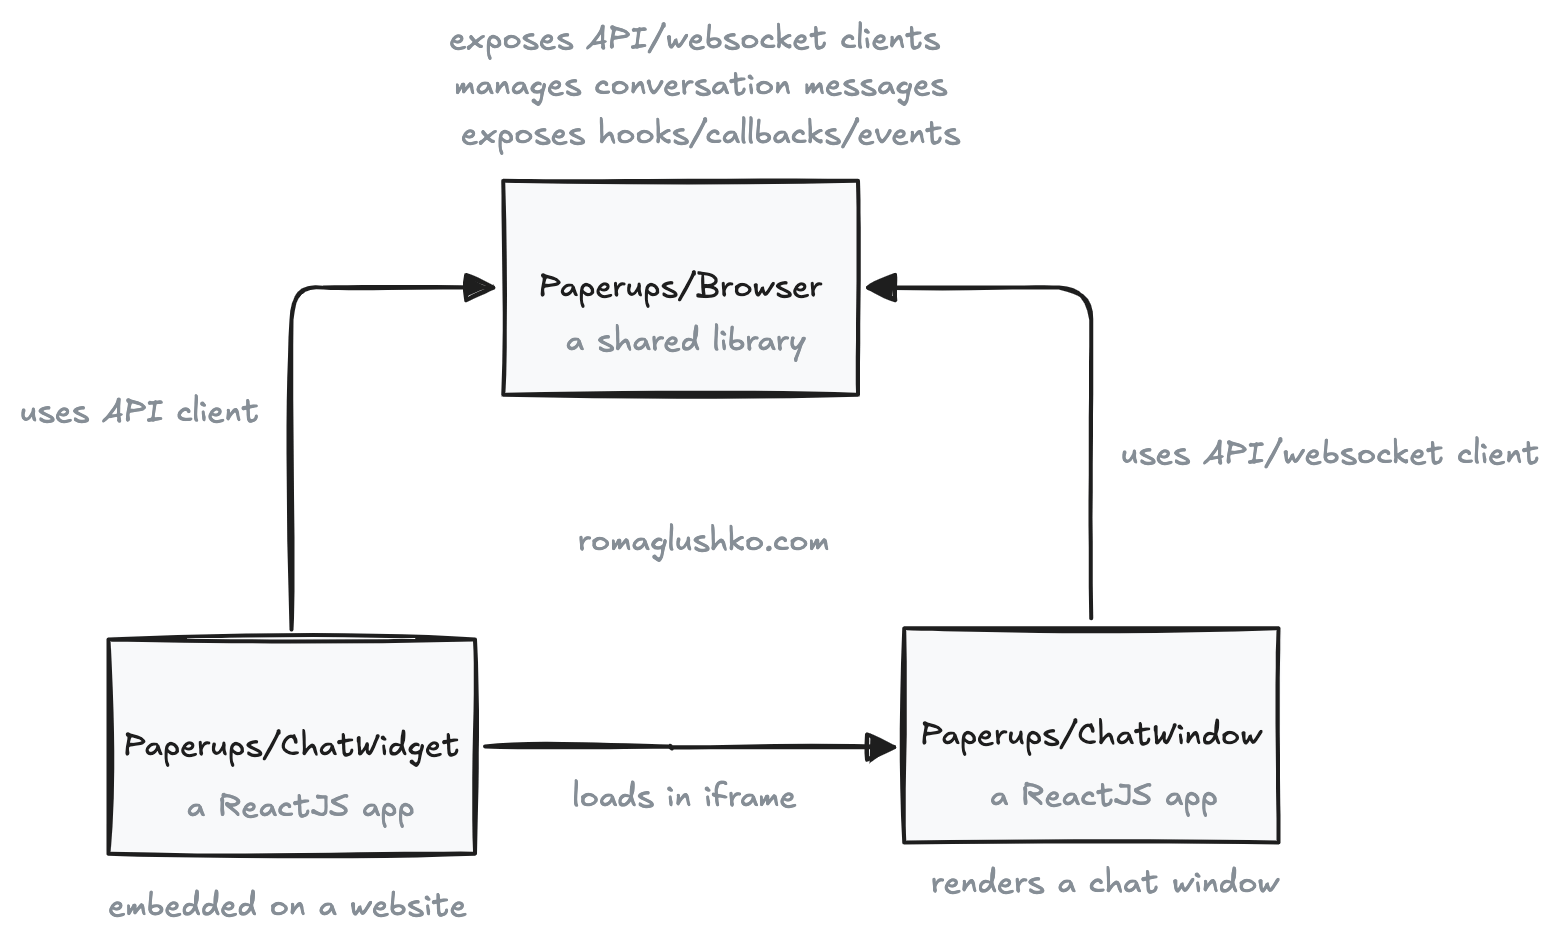
The widget applications use Theme UI for styling.
It provides a rich set of components that can be styled in the styled-components fashion.
The result is that the styling is bundled along with other JS which is useful to keep widget.js self-contained without a need to request external CSS files.
This way widget.js is as lightweight as possible and all heavy-lifting is done inside the chat window iframe.
Rendering the chat window application in an iframe has a few merits. Iframes isolate the chat window behavior and styles from the parent website’s assets. This helps to avoid styling clashes or rendering the website broken because of issues in the chat window. Apart from that, if there are any security vulnerabilities in the chat window application, it would be much harder to exploit them to harm the host website.
The chat window iframe is sandboxed with the following permissions:
allow-scriptsallow-popupsallow-same-originallow-forms
The chat window iframe also comes with some inconveniences as
it’s isolated from the widget.js application just like from the other host website code, so any interactions between
the chat widget and the chat window are more complicated and possible only via message event posting.
Because of these iframe specifics, the widget.js passes widget configurations
to the chat window application via iframe URL query params along with other information
like customer metadata or the widget.js library version.
The Papercups/Browser is a vanilla JavaScript library
that provides a singleton Papercups object with the whole conversation logic.
The library doesn’t contain any ReactJS code or components.
Instead, the other applications like the chat window inits it, subscribe to
its events, and update their views in callbacks:
export type Config = {
  accountId: string;
  customerId?: string | null;
  inboxId?: string;
  baseUrl?: string;
  greeting?: string;
  awayMessage?: string;
  customer?: CustomerMetadata;
  debug?: boolean;
  setInitialMessage?: (overrides?: Partial<Message>) => Array<Message>;
  onSetCustomerId?: (customerId: string | null) => void;
  onSetConversationId?: (conversationId: string) => void;
  onSetWidgetSettings?: (settings: WidgetSettings) => void;
  onPresenceSync?: (data: any) => void;
  onConversationCreated?: (customerId: string, data: any) => void;
  onMessageCreated?: (data: any) => void;
  onMessagesUpdated?: (messages: Array<Message>) => void;
};
export type Config = {
accountId: string;
customerId?: string | null;
inboxId?: string;
baseUrl?: string;
greeting?: string;
awayMessage?: string;
customer?: CustomerMetadata;
debug?: boolean;
setInitialMessage?: (overrides?: Partial<Message>) => Array<Message>;
onSetCustomerId?: (customerId: string | null) => void;
onSetConversationId?: (conversationId: string) => void;
onSetWidgetSettings?: (settings: WidgetSettings) => void;
onPresenceSync?: (data: any) => void;
onConversationCreated?: (customerId: string, data: any) => void;
onMessageCreated?: (data: any) => void;
onMessagesUpdated?: (messages: Array<Message>) => void;
};The key state that the library maintains is the conversation messages. It’s just a plain JS array of message objects (not a ReactJS state) that are updated by the library. When an update happens, the library simply calls back the corresponding listeners.
Widget Settings
We have seen above that it’s possible to pass widget configurations via window.Papercups.config object.
These configurations are defined and specified externally, we have no control over them.
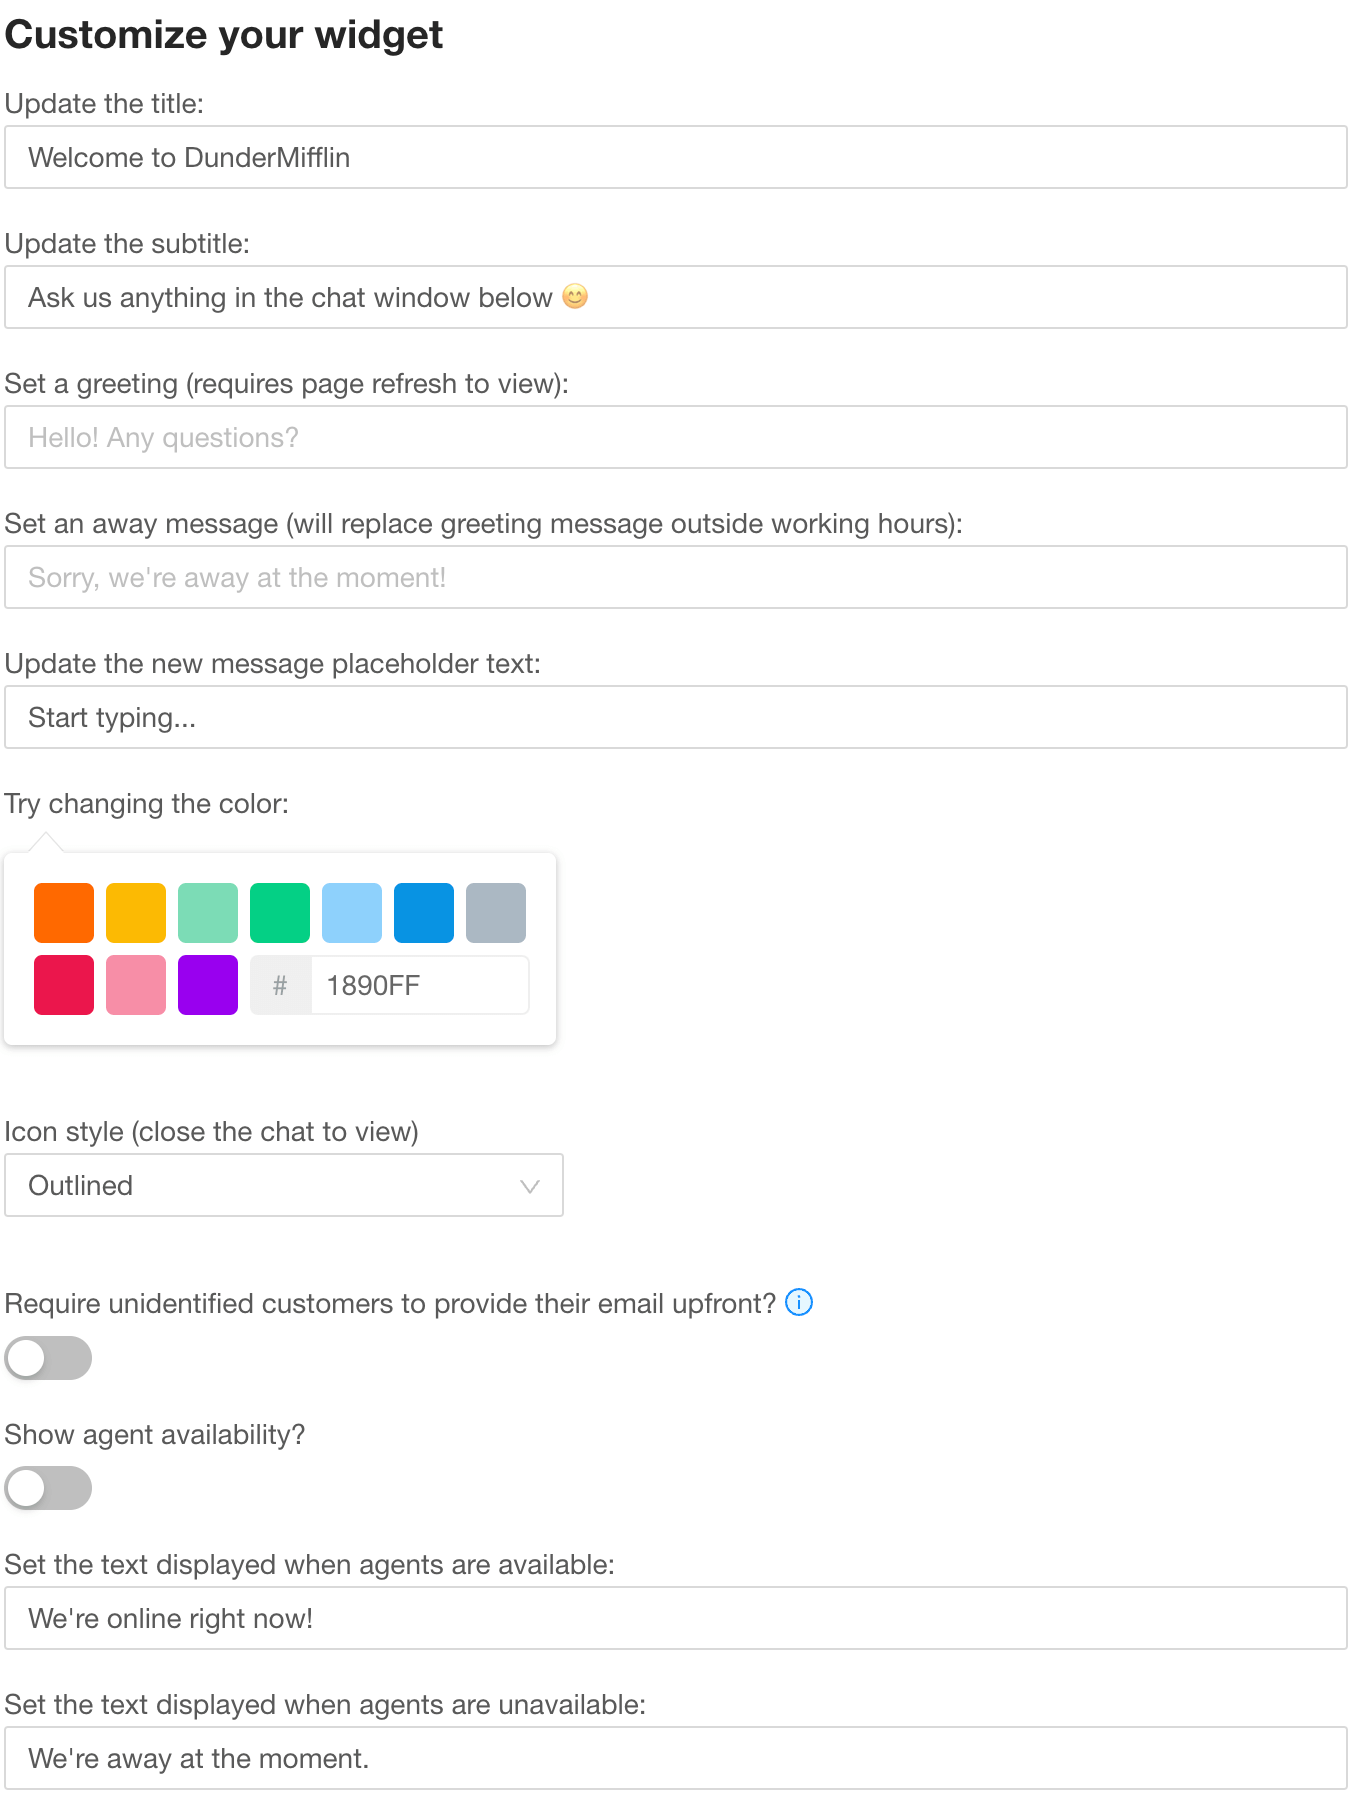
Apart from that, during setting up a new live widget, you can build the desired config right from the Papercups UI.
When that happens, Papercups saves the settings on the account_id and inbox_id levels.
These settings serve as defaults for the corresponding chat widget instance.
On chat widget initialization, the widget tries to combine the configurations provided in the window object with the widget settings fetched from the backend. Then the combined settings are passed into the chat window iframe via URL query params.
Along the way, the chat widget sends a request to update widget metadata which consists of hostname, path, last_seen_at where the widget instance was seen.
It’s used for analytics purpose.
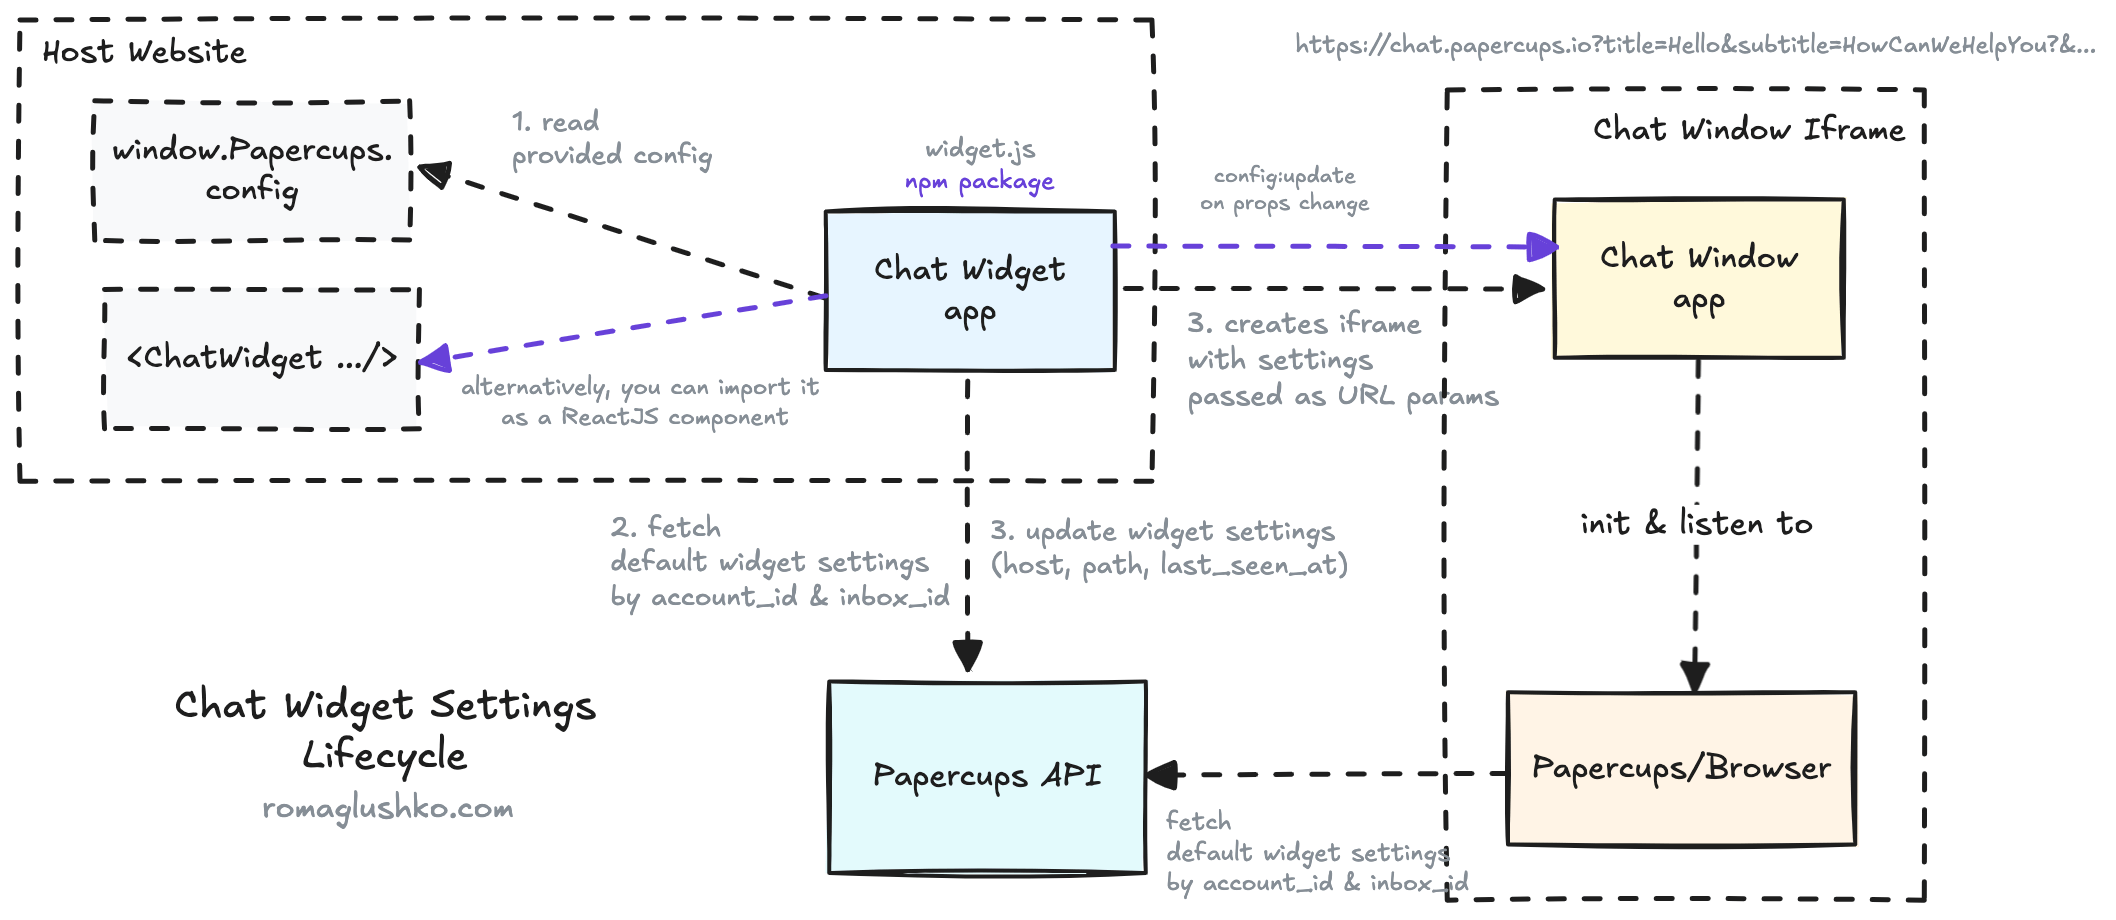
The chat window renders the window content according to the passed config. It also inits the Papercups object that additionally fetches widget settings, but they don’t seem to be used much (although this specific workflow would be helpful if you used the library directly).
The chat widget can be also installed as an NPM package and imported directly into a ReactJS project.
For that specific use case, the widget supports the config:update message event that is posted to the chat window iframe to help the widget component properly update widget settings on change.
The widget settings API is used as an enforcement for the Papercups chat branding. If you are not on the team subscription plan, then you cannot disable Papercups branding, but if you are, you may disable or keep it.
Identify Widget Customers
There are likely better ways to do it (e.g. using cookies), but Papercups goes super simple about customer identification in the live conversations.
First of all, the host website has an option to specify customer information as a part of the window.Papercups.config:
<script>
window.Papercups = {
  config: {
    // ...
    customer: {
        name: __CUSTOMER__.name,
        email: __CUSTOMER__.email,
        external_id: __CUSTOMER__.id,
        metadata: {
            plan: "premium"
        }
    }
  },
};
</script><script>
window.Papercups = {
config: {
// ...
customer: {
name: __CUSTOMER__.name,
email: __CUSTOMER__.email,
external_id: __CUSTOMER__.id,
metadata: {
plan: "premium"
}
}
},
};
</script>If you happen to deal with an authenticated customer session, this is a way to share that bit of context with Papercups.
Other than that, the chat widget and the chat window try to find an existing customer ID in the local storage and
collect the basic information about Customer like OS, browser, screen resolution, time zone, etc.
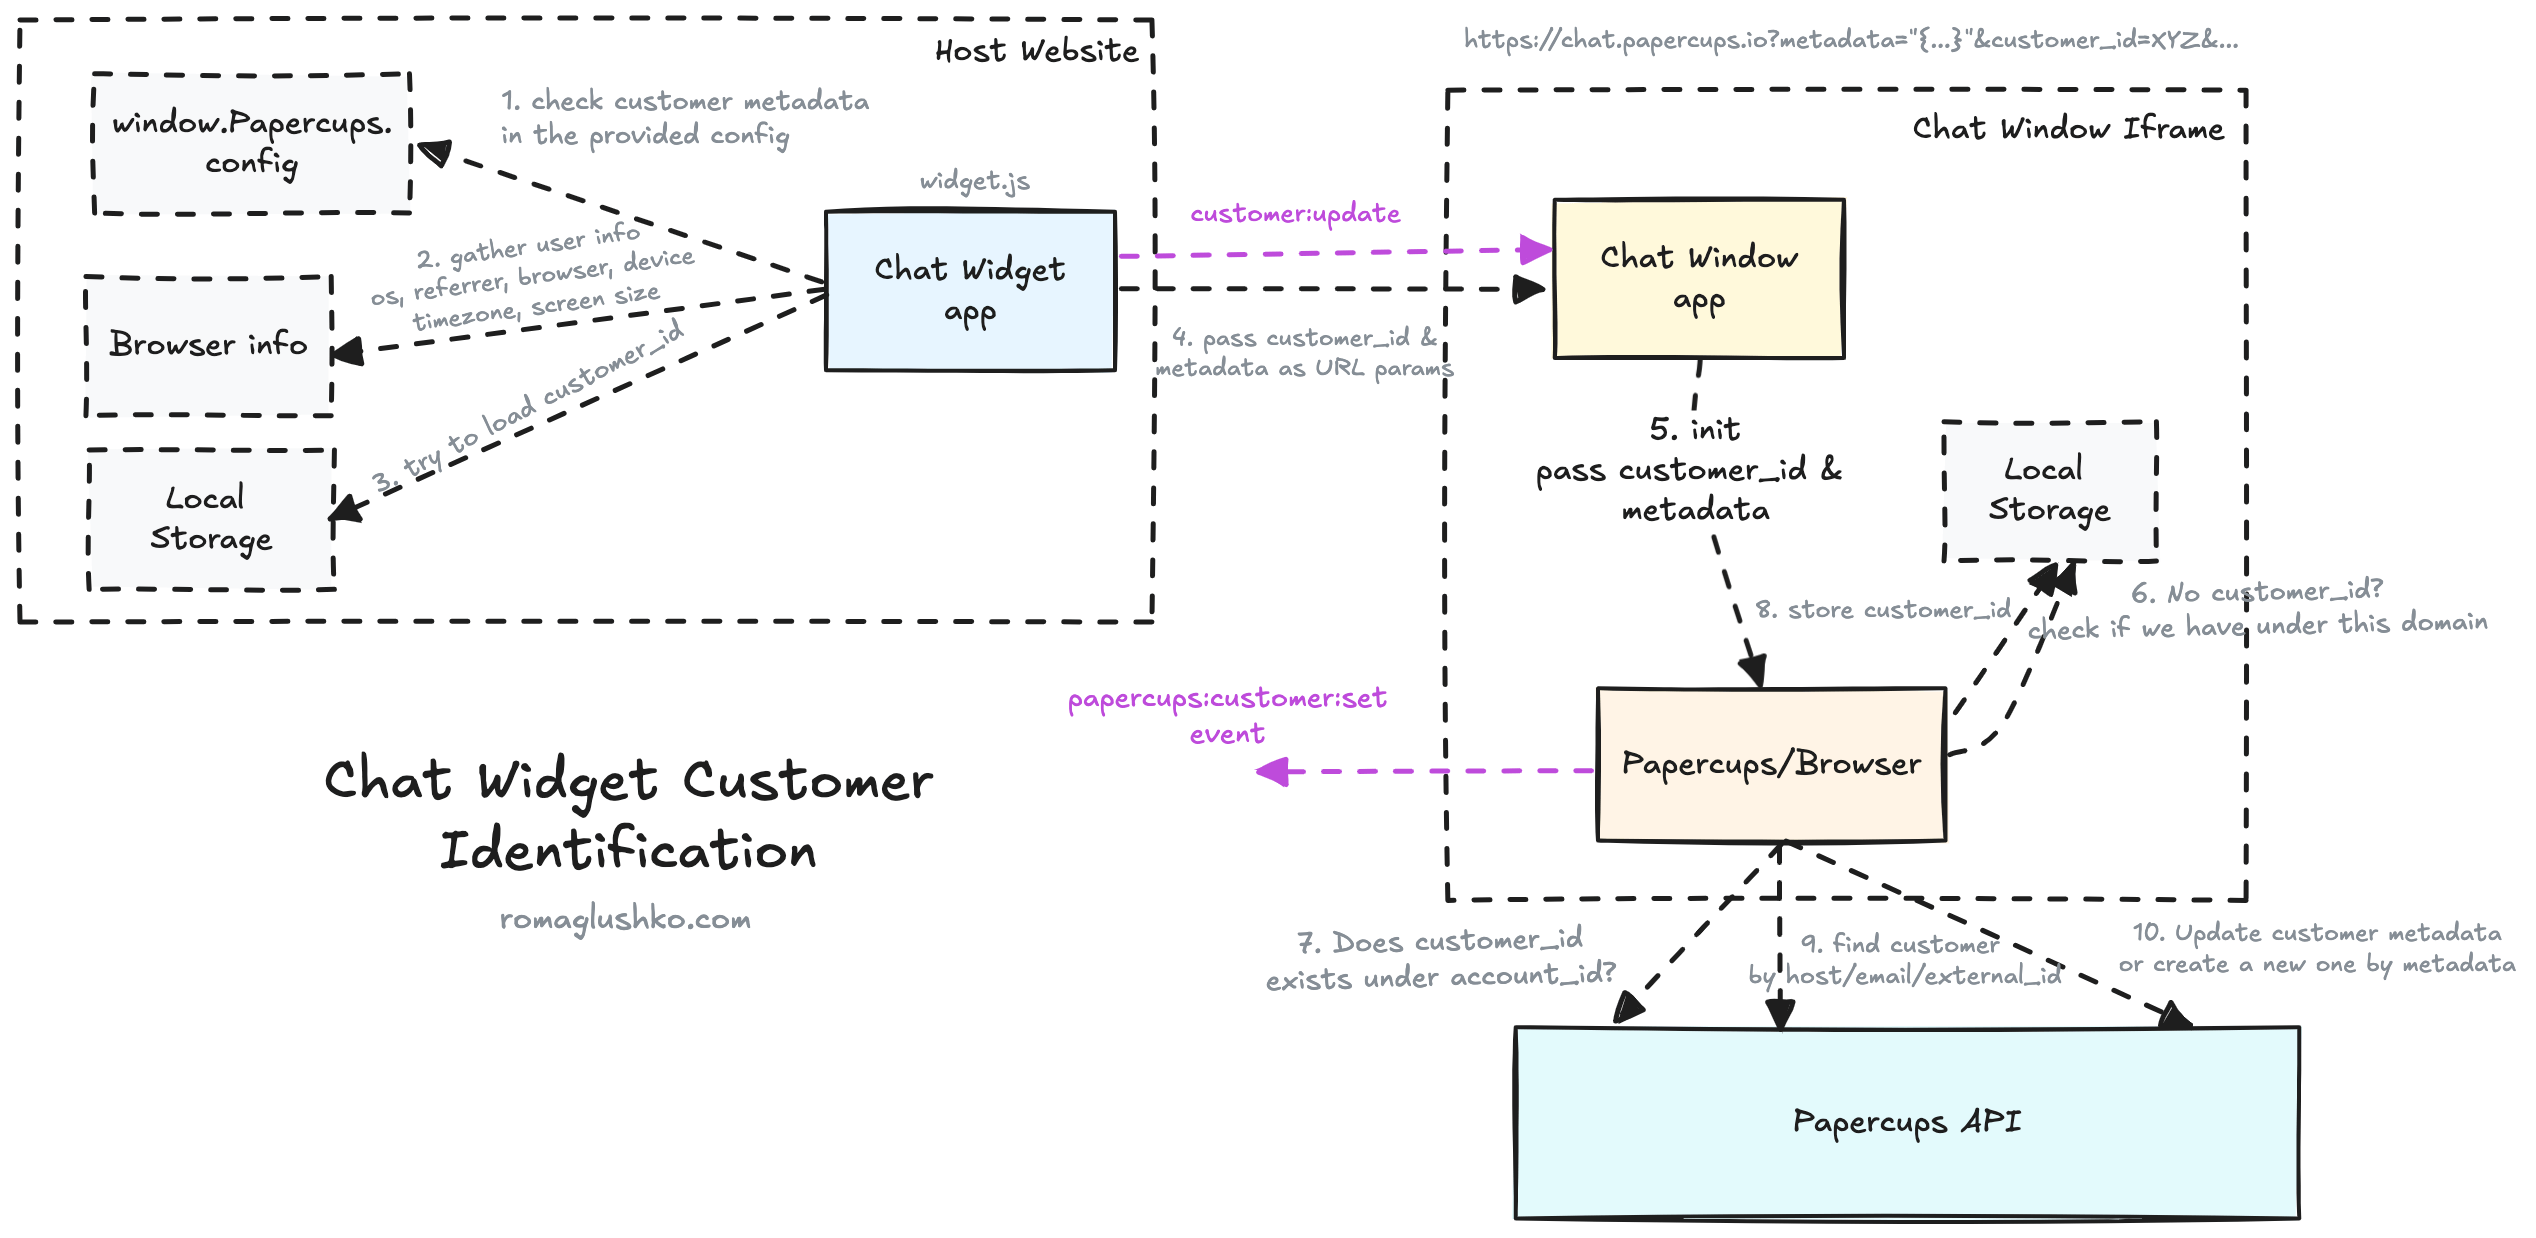
If there is a customer ID in the local storage, we validate if the Papercups API knows about this ID and if it belongs to the current Account.
If not, we try to find a customer by hostname, email, external ID.
If we fail to do that, we create a new Customer under the given Account.
Otherwise, we update the existing customer metadata and persist its ID in the local storage.
The Live Chatting
Yet again, we have a need to identify a conversation, but now it’s in the live chat setup.
It would not be cool to miss the whole conversation when the browser tab was closed or reloaded.
Papercups goes simple about this and fetches the latest open chat conversation for the specific customer_id, account_id, and inbox_id.
The customer_id is persisted in the local storage, so it was set once anywhere it would be available to the chat widget.
For all real-time interactions, Papercups uses Phoenix Channels.
Phoenix Channels uses websocket as transport and
establishes bi-directional communication channels between Customers and agent Users.
There are three channels that each Customer joins while interacting with the live chat:
- Conversation Channel (e.g.
conversation:{conversation_id}) - The channel where all messages for the given conversation are broadcasted. The live chat joins them when the last conversation is identified or a new one is created. - Conversation Lobby Channel (e.g.
conversation:lobby:{customer_id}) - The channel through whichCustomeris notified about a new conversation. The agentUsercan start a new conversation with theCustomerthis way. - Account Room Channel (e.g.
room:{account_id}) - Broadcast availability of the agents from the givenAccount.
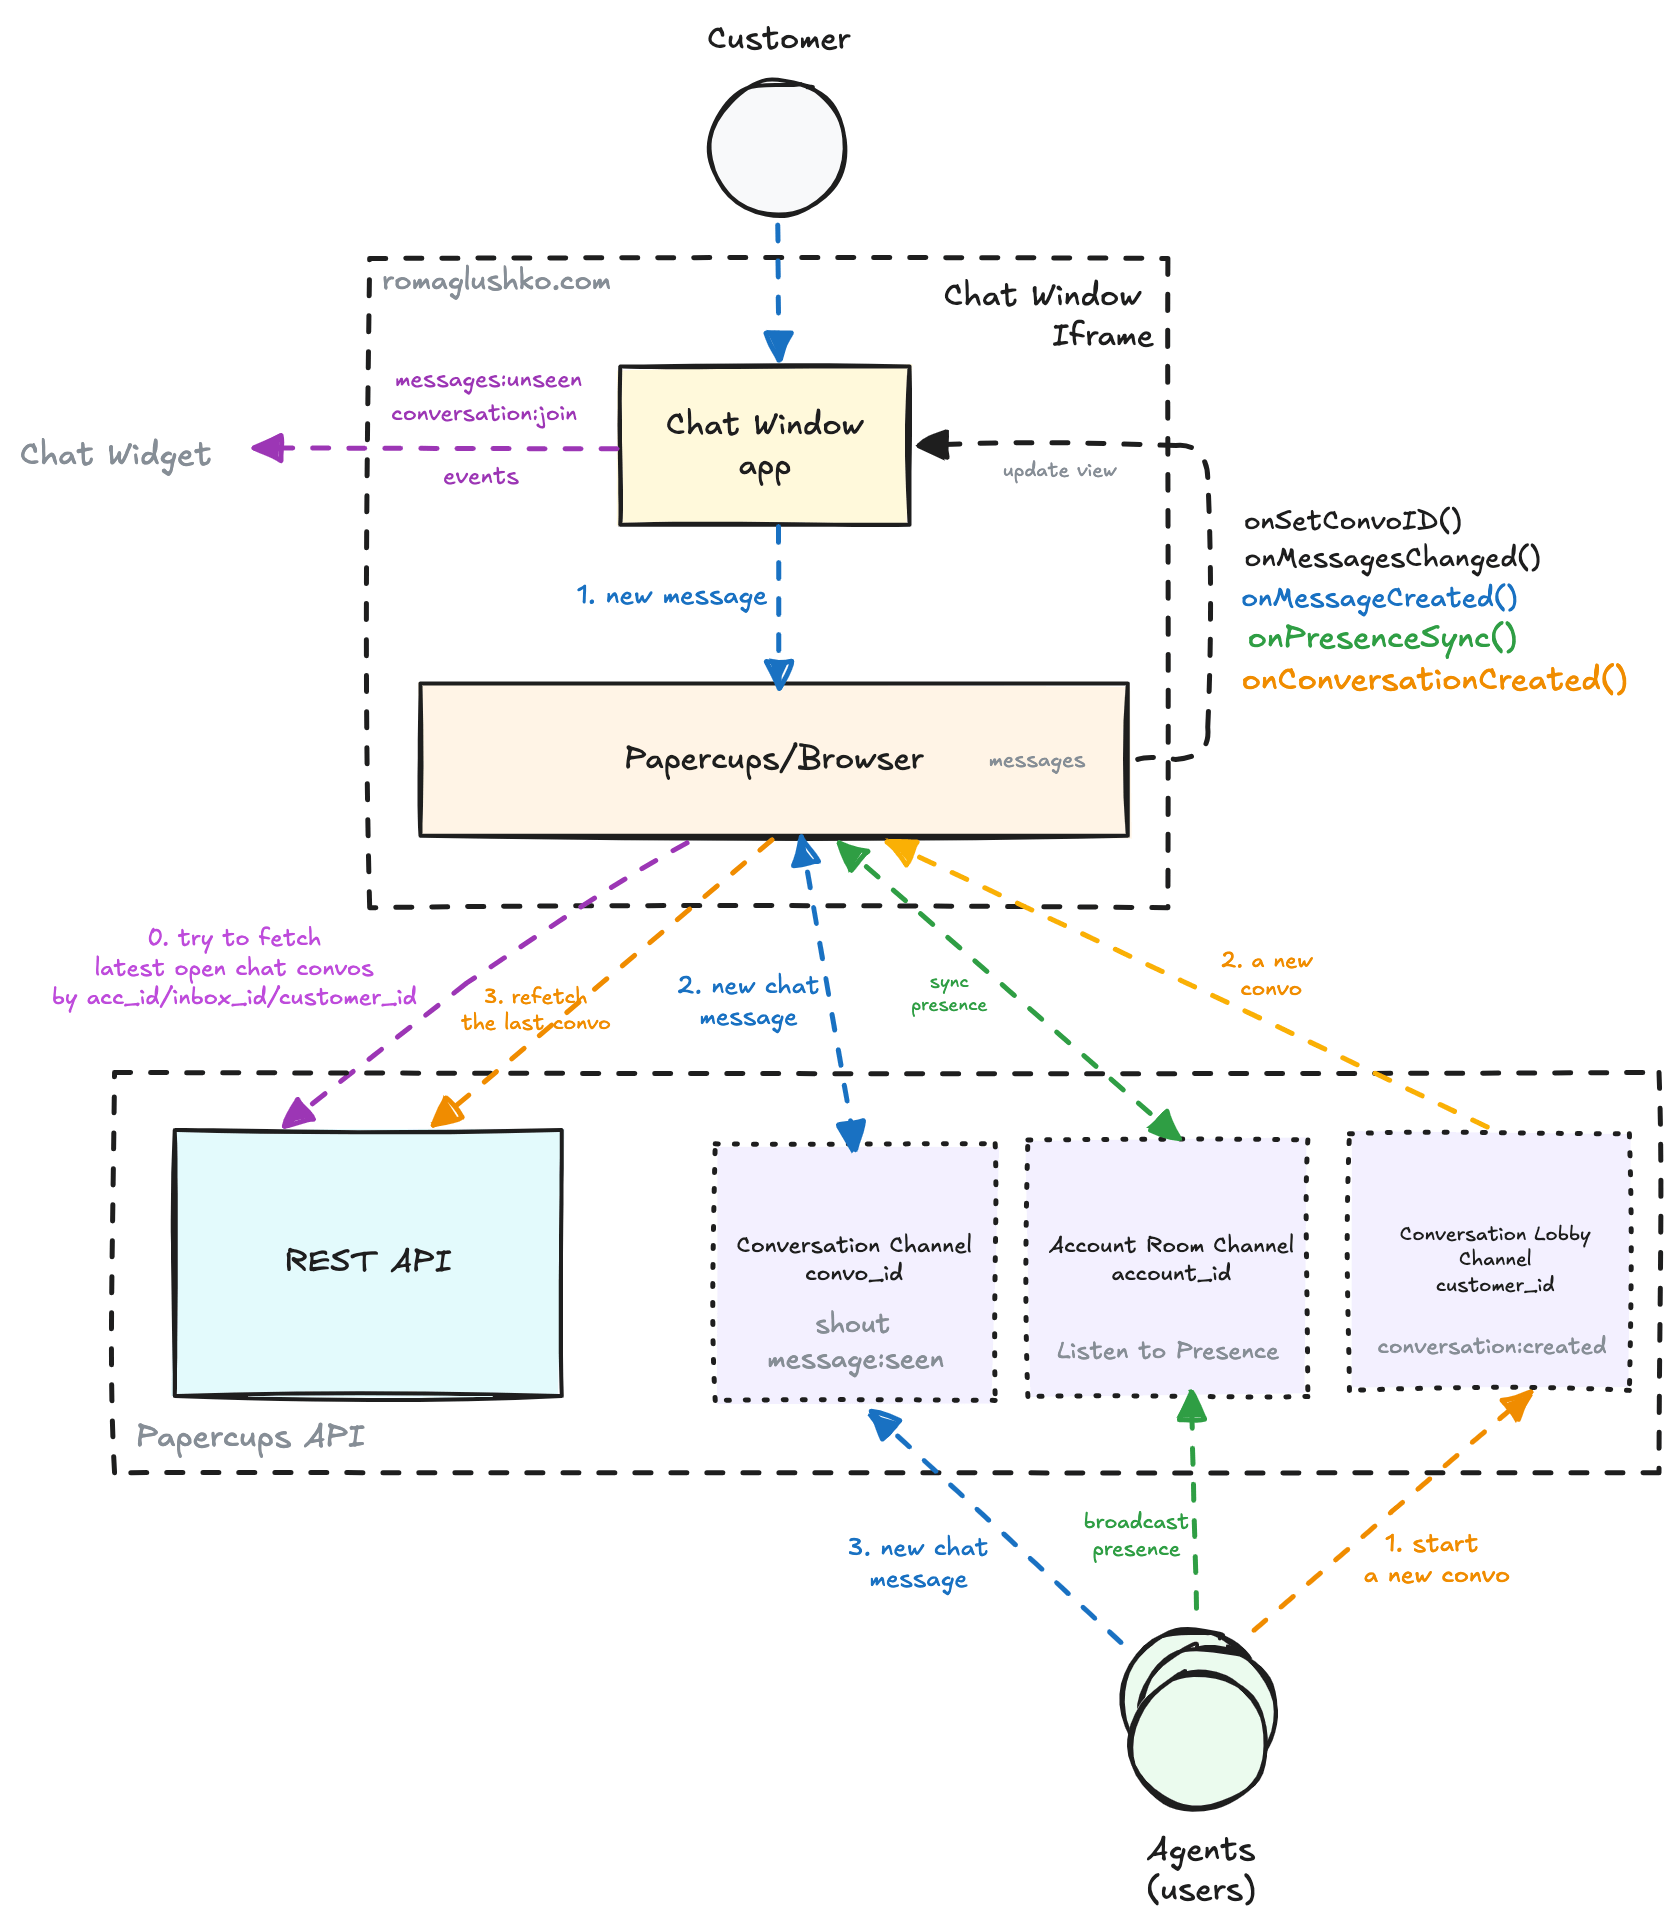
The conversation is either fetched from the backend or created upon a new message from Customer.
The list of conversation messages are handled by the Papercups/Browser library and not by the chat window application.
The library updates its internal messages state and then executes callbacks like onMessagesChanged
to notify the chat window application to rerender the chat window.
The chat window sets the new messages to its ReactJS state and that rerenders the chat window.
When Customer sends a new message, the message gets added to the messages list and then send to the conversation channel as a shout event.
Then, the server processes and saves the message and echoes it back with an updated metadata into the same channel.
This is used as a way to ensure the message is acknowledged and saved.
The conversation lobby channel is a way to initialize a new conversation by User (for example, from the storytime session view).
When that happens, the library switches the live chat to another conversation.
The account room channel is used to broadcast the agent availability status. It’s fully powered by the Phoenix Presence functionality.
The Message Seen or Not?
Finally, the chat widget tries to keep track of messages that Customer has already seen or not.
When a new agent message arrives, the chat window application figures out if Customer is looking at the chat widget or not.
This is done as a check to the widget toggle state (open or not?) and the browsers document.hidden API.
If the message was received but the chat window had been closed or the host website tab had not been active,
the chat window plays a notification sound to bring attention back to the chat.
In addition to this, the chat window application listens to the visibilitychange event to find out when the tab is active again.
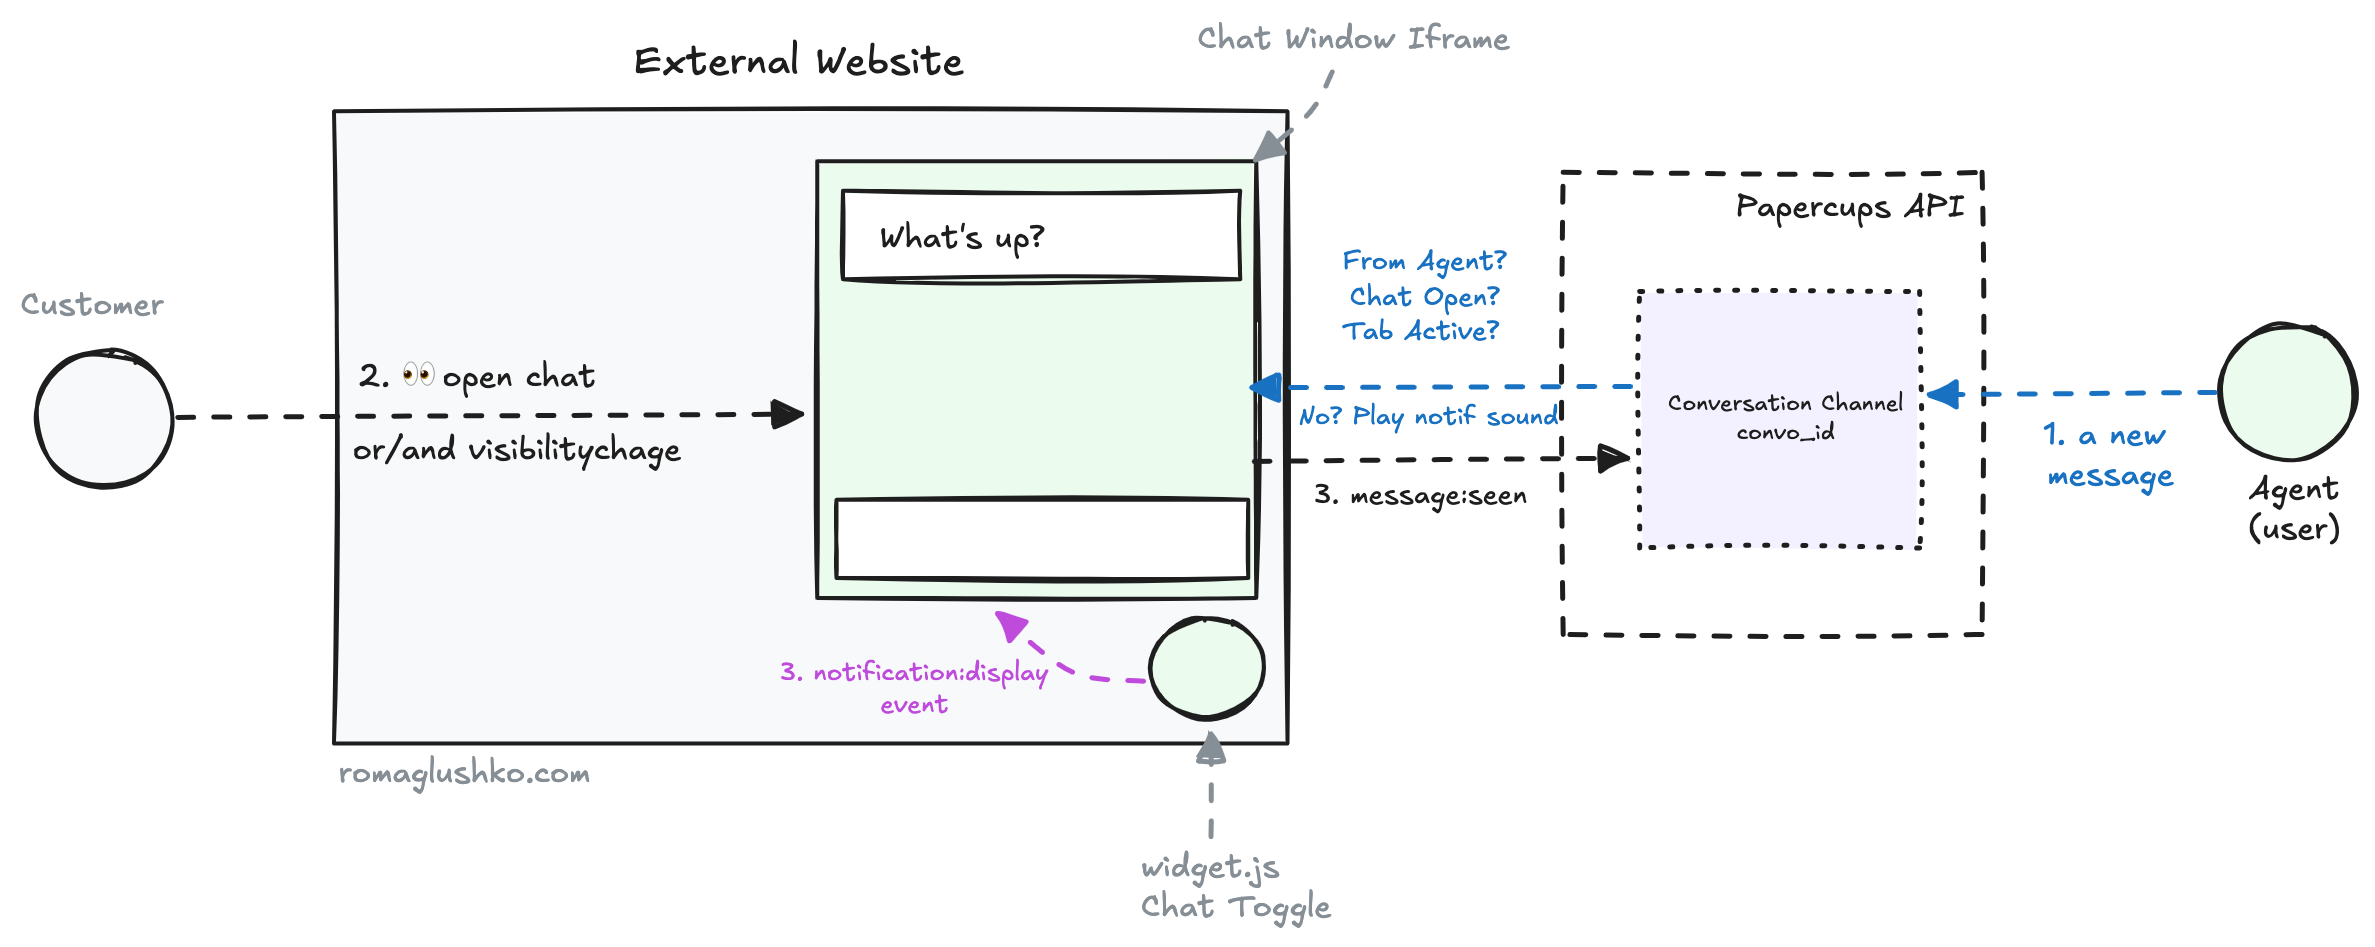
Once Customer has seen the messages, the chat window application sends the messages:seen event to the conversation channel,
so the backend marks the agent’s messages as seen, too.
Reply Channels
Email forwarding, SMS, Gmail thread sync, and live chat widget
are message source channels that populate Papercups’ Inboxes.
There is another type of channels called reply channels.
Reply channels are a handy way to reply to Papercups’ Conversations right from your Slack or Mattermost spaces.
Both Slack and Mattermost integrations are conceptually similar, so we will focus on the Slack only.
The platform supports Slack thread syncing (just like Gmail thread syncing) and handles Conversations
right from the Slack threads. Both functionalities require authorizing Papercups to work with your Slack workspace.
The Slack supports the OAuth2 authorization workflow just like Gmail. Papercups requests quite a few scopes to work
with Slack channels, private groups, chat messages, message files, reactions, and Slack user info.
Once the authorization is done, Papercups saves the access_token, bot, team, webhook information, etc.
as a separate SlackAuthorization entity.
Then, the User has to invite the Papercups Bot application into the needed channels to finish the setup.
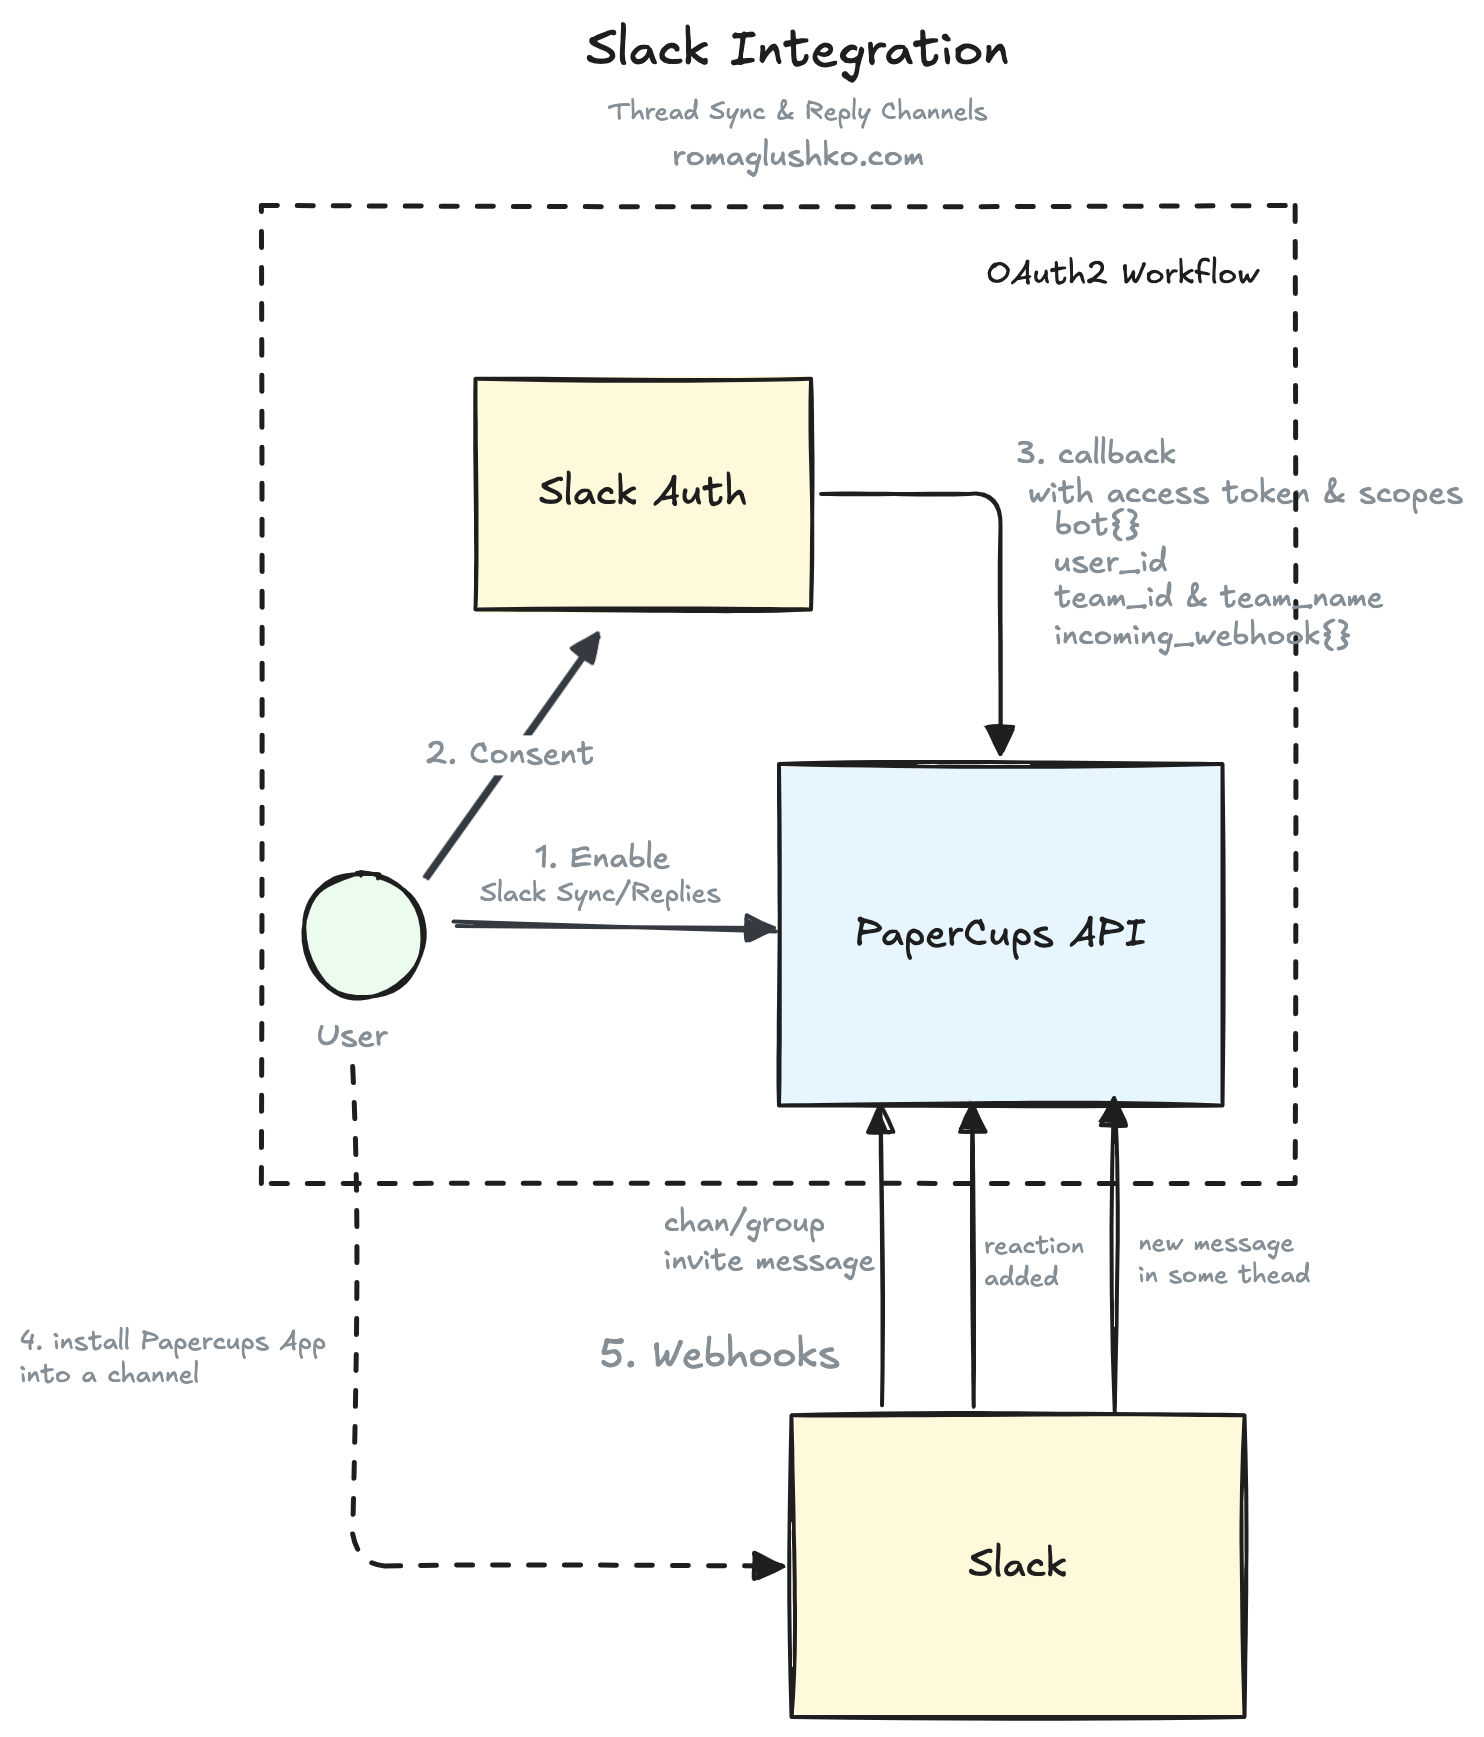
After this, the platform will start receiving various Slack events via webhook calls.
The key event is when a new message is added to the channel or private group.
Papercups identifies if the new message is from the channel associated with the reply type and then loads
the corresponding Conversation via metadata stored in the SlackConversationThread (similar to GmailConversationThreads) to create a new Message there.
Otherwise, the message is assumed to be from a support channel and
Papercups performs sync of messages in this Slack thread if it’s known or creates a new SlackConversationThread if not.
Storytime
The Papercups use cases revolve round customer support. Imagine a situation where a customer has a problem filling in a form. Would not it be nice to see what customer was actually doing and how they were trying to submit the form? Papercups has an experimental support for this sort of functionality called Storytime.
Storytime is essentially a browser session tracking library that is bundled as a separate embedded JavaScript file.
It uses the window.Papercups.configs info to seamlessly integrate with host websites that are already using
the Papercups live chat widget.
The Storytime operates on two key concepts: browser sessions and browser replay events.
Browser sessions are a way to track the activity of a specific tab or window when Customers browse the host website.
When they do that, Customers emits a various replay events that Papercups collects and replays for Users in the dashboard.

On initialization, the Storytime script tries to find out if there is any existing browser session stored in window.sessionStorage.
If the session exists, it validates its ID and restarts which simply means resetting the browser session finish_at timestamp.
Then, Storytime updates the customer metadata of the session.
If there is no session, Storytime starts a new one and stores it in the window.sessionStorage.
Interestingly, the start request is done as a beacon request.
After that, Storytime does only two things:
- Tracks activity of the current tab to emit
session:activeandsession:inactiveevents (rendered on the session listing page to indicate if anything is going on in those sessions). - Watch for customer activity on the page via rrweb library and emit
replay:event:emittedevents.
All these events go into one browser session events channel (e.g. events:{account_id}:{session_id}).
The browser events are stored then into database (to replay them when the session is over).
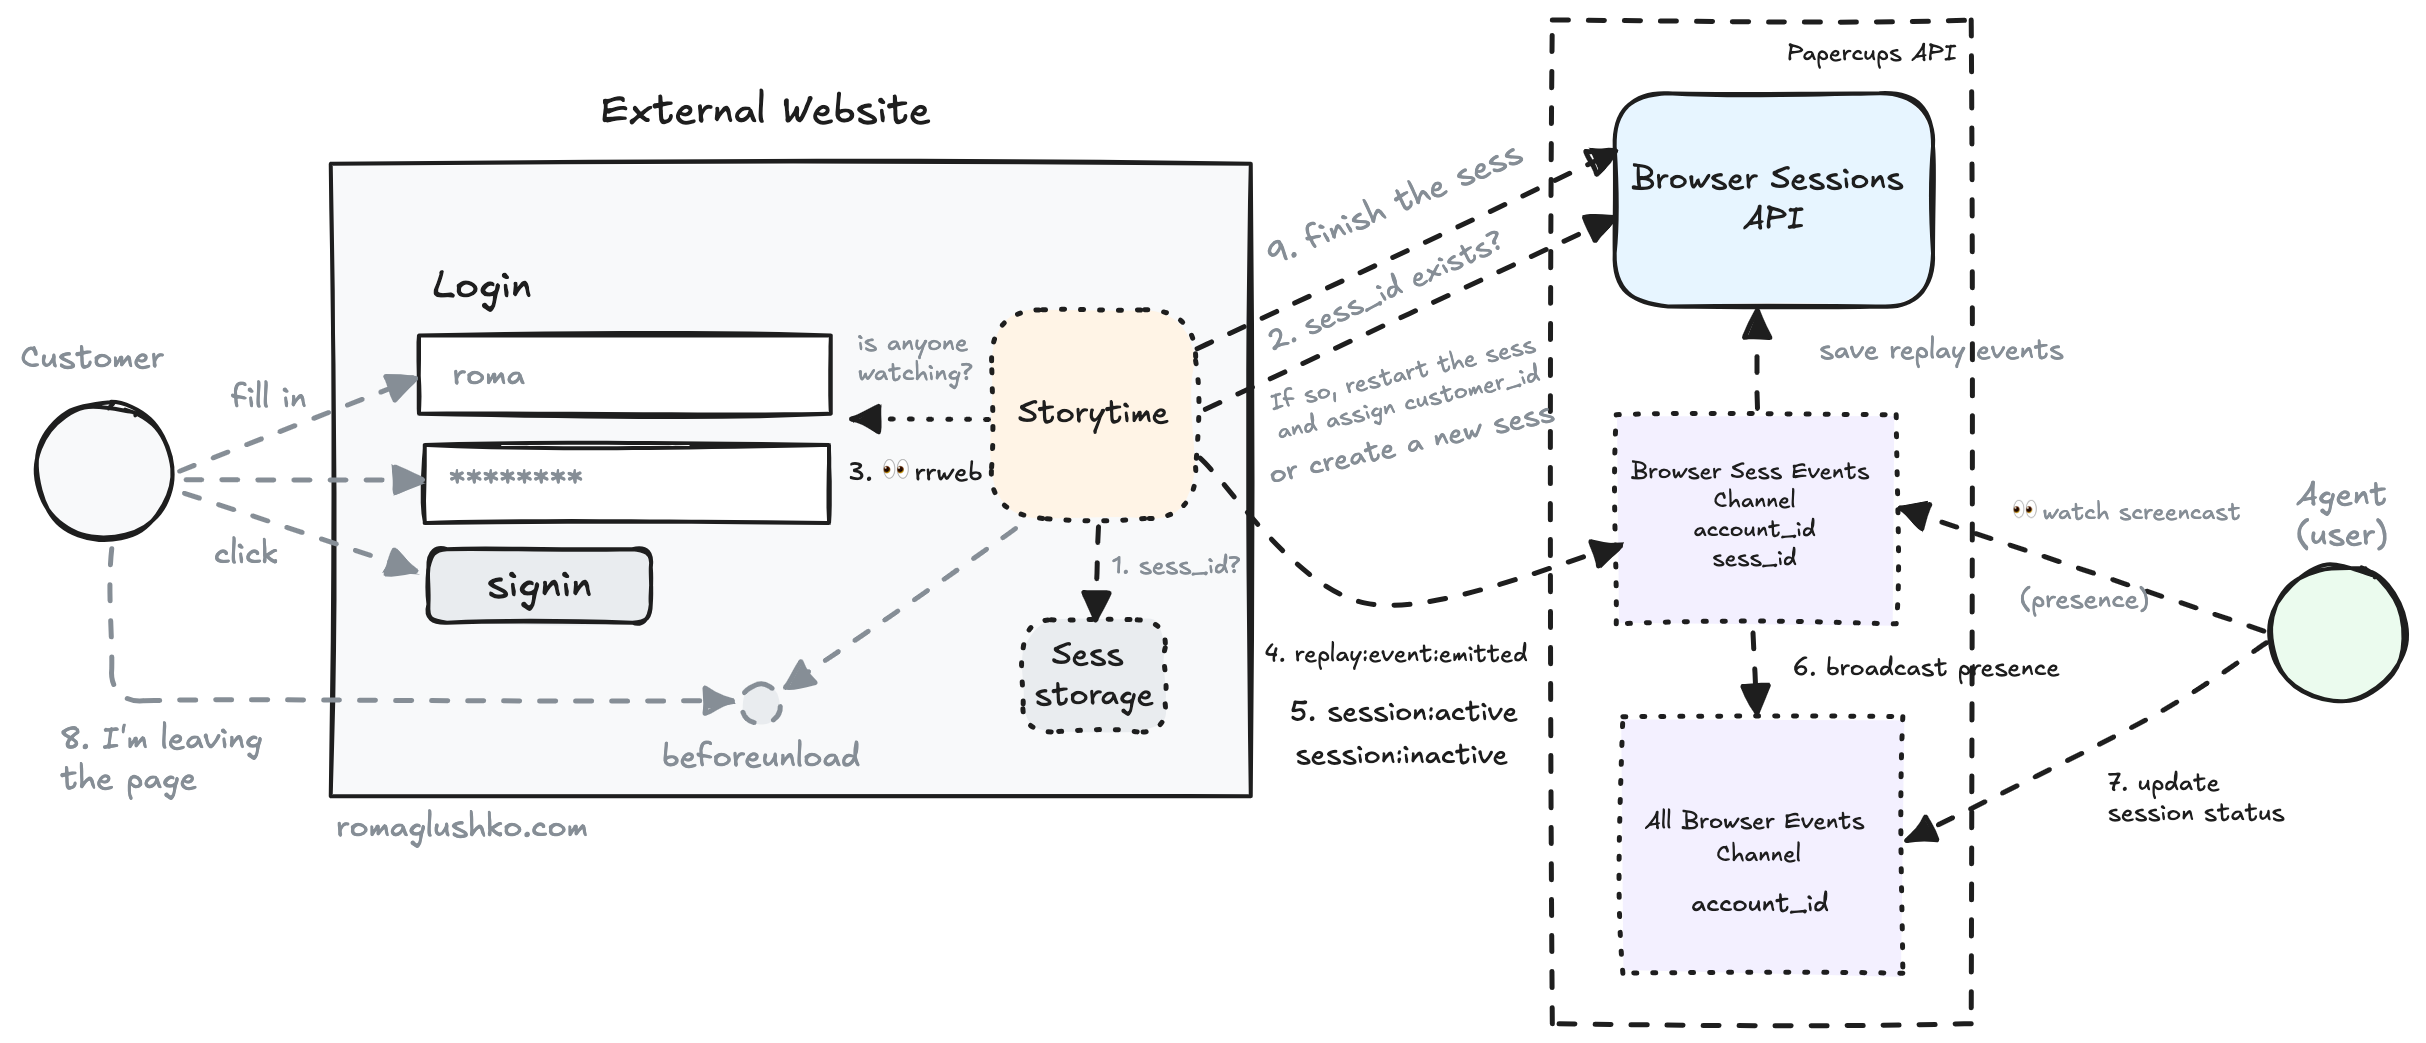
On the dashboard end, Users actually connects to two channels:
- The browser session events channel to receive and replay events in real time
- The account browser session events channel (e.g.
events:admin:{account_id}) to receive updates about sessions’ statuses.
Storytime heavily uses Phoenix Presence.
If no Users are watching events of a specific browser session, Papercups don’t record them.
Also, it updates presence metadata to reflect session activity in the all browser sessions channel.
Storytime listens to the beforeunload event and sends another beacon request to finish the session.
Webhooks & Functions
Papercups owns an important piece of information about organization’s customer interactions. It’s very natural that some of them would like to implement additional automations on top of the existing Papercups functionality.
For example, when a new customer message arrives, we may want to show it to our LLM agent to see if it can respond meaningfully without involving the support team.
In order to achieve that, the platform provides an ability to subscribe to conversation events and trigger some functions when the events occur.
Subscribe to Events
The webhook functionality looks very simple. There is a way to add a new webhook HTTP endpoint which must be accessible by the platform.
On webhook registration, Papercups sends a verification request to the endpoint. The platform sends it a random 64-char token and expects it to be echoed back.
All verified webhooks are eligible to receive real events.
Papercups defined only two events: conversation:created and message:created.
The event names serve as a scope for webhooks, so you may decide what events to receive.
Functions
The functions are event handlers that are deployed as serverless functions. Serverless functions are a very good cost-efficient alternative to webhooks that don’t require any infrastructure maintenance and well-suited for ad-hoc nimble automation.
Papercups uses AWS Lambda as a serverless function backend behind their function API.
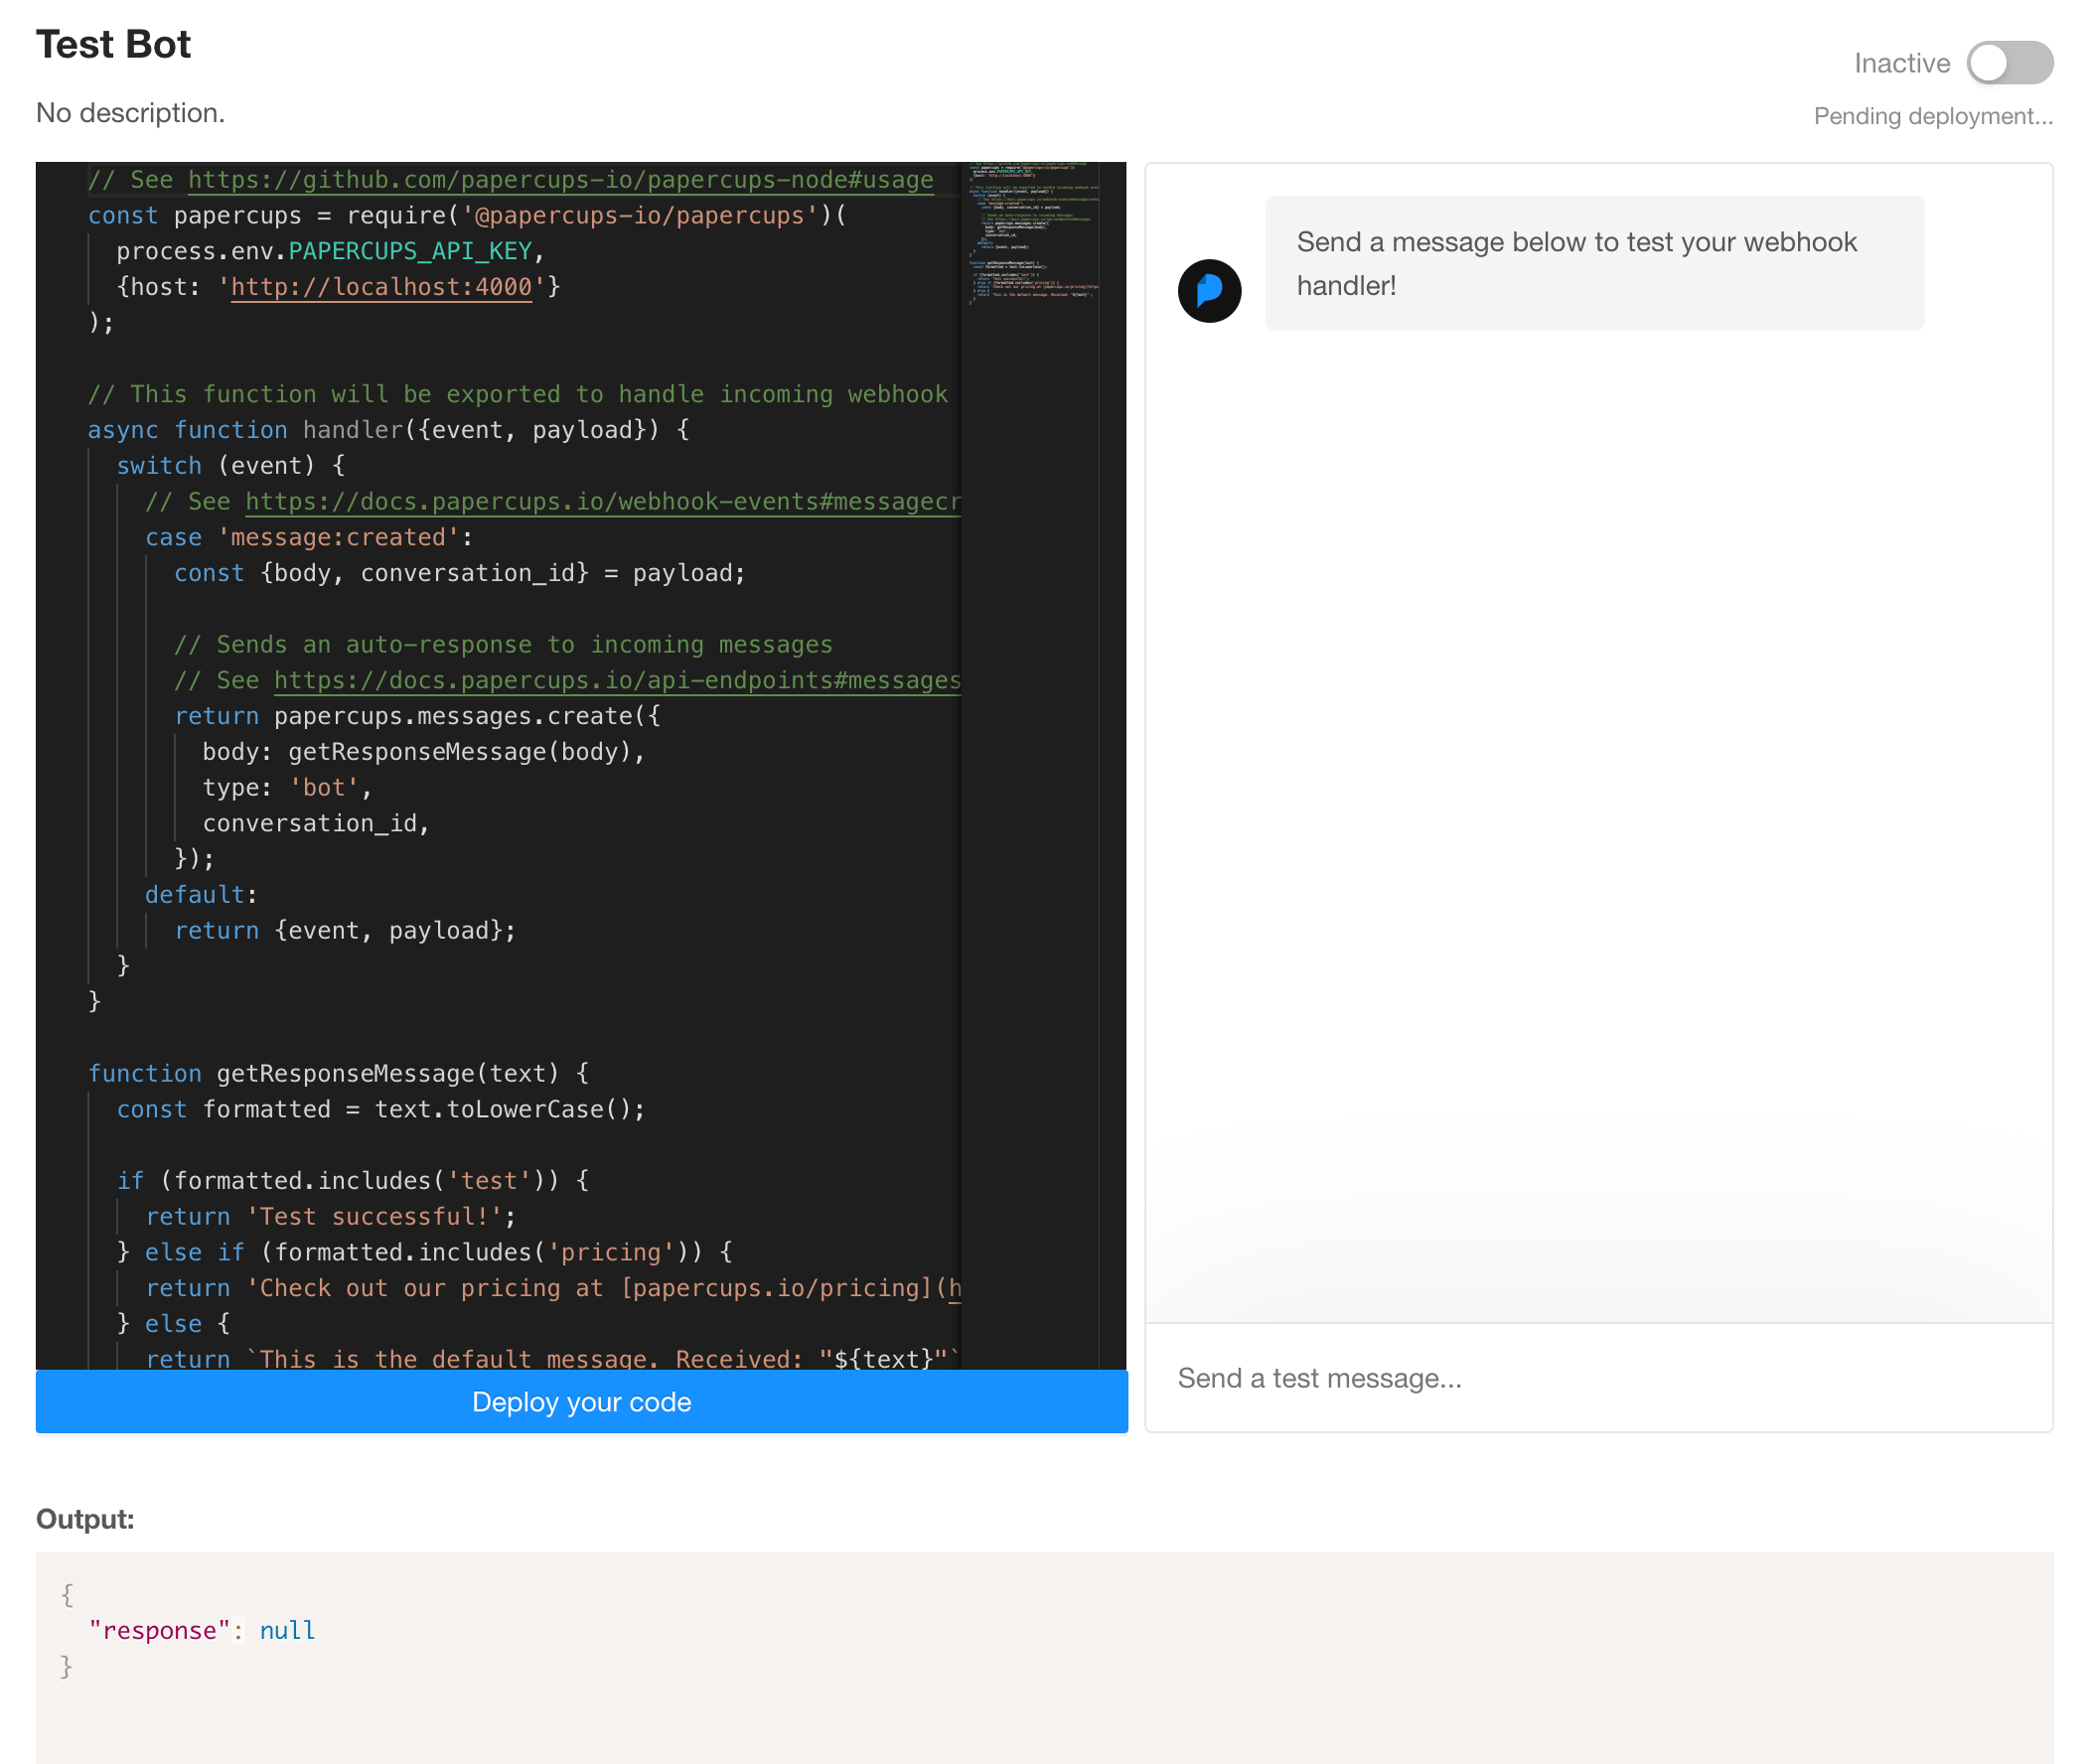
The typical function receives a Papercups event, inspects it and does a request back to Papercups Public API or elsewhere.
That’s easier to say than to do, because to do that from a serverless function, you need:
- authenticate your request
- do a request in a nice way e.g. via Papercups client library
When User is done editing the function code,
the Dashboard UI packs the function code (e.g. putting it in index.js) along with the content of deps.zip served by the Papercups server.
The deps.zip contains additional node_modules dependencies that the function needs to run including
the Papercups client library.

The backend receives the updated zip file and uploads it to a separate AWS S3 bucket that holds all the function codes. The unique function name is used as a S3 object key.
Finally, the backend creates a new Lambda function referencing the files uploaded to the AWS S3 bucket. Along with the code reference, Papercups specifies:
- Runtime (e.g. NodeJS of the needed version)
- Event handler (e.g.
index.handler) - AWS ARN role to limit exposure of AWS functionality to functions
- Environment variables with the Papercups API key to seamlessly allow accessing the public API
That’s it. The function is ready to be invoked on events which involves calling one more AWS API with event payload.
Reporting & Analytics
Papercups has two types of reporting:
- the account-wide reporting to track how well the support team engages with customer requests
- platform-wide reporting used to check the overall growth of the product
Account Reporting
The account-level engagement reports consist of simple aggregative statistics like:
- the number of messages and conversations
- the number of messages per
User - the number of messages per weekday
- the number of messages sent and received
All these statistics are calculated per each day of the given time range.
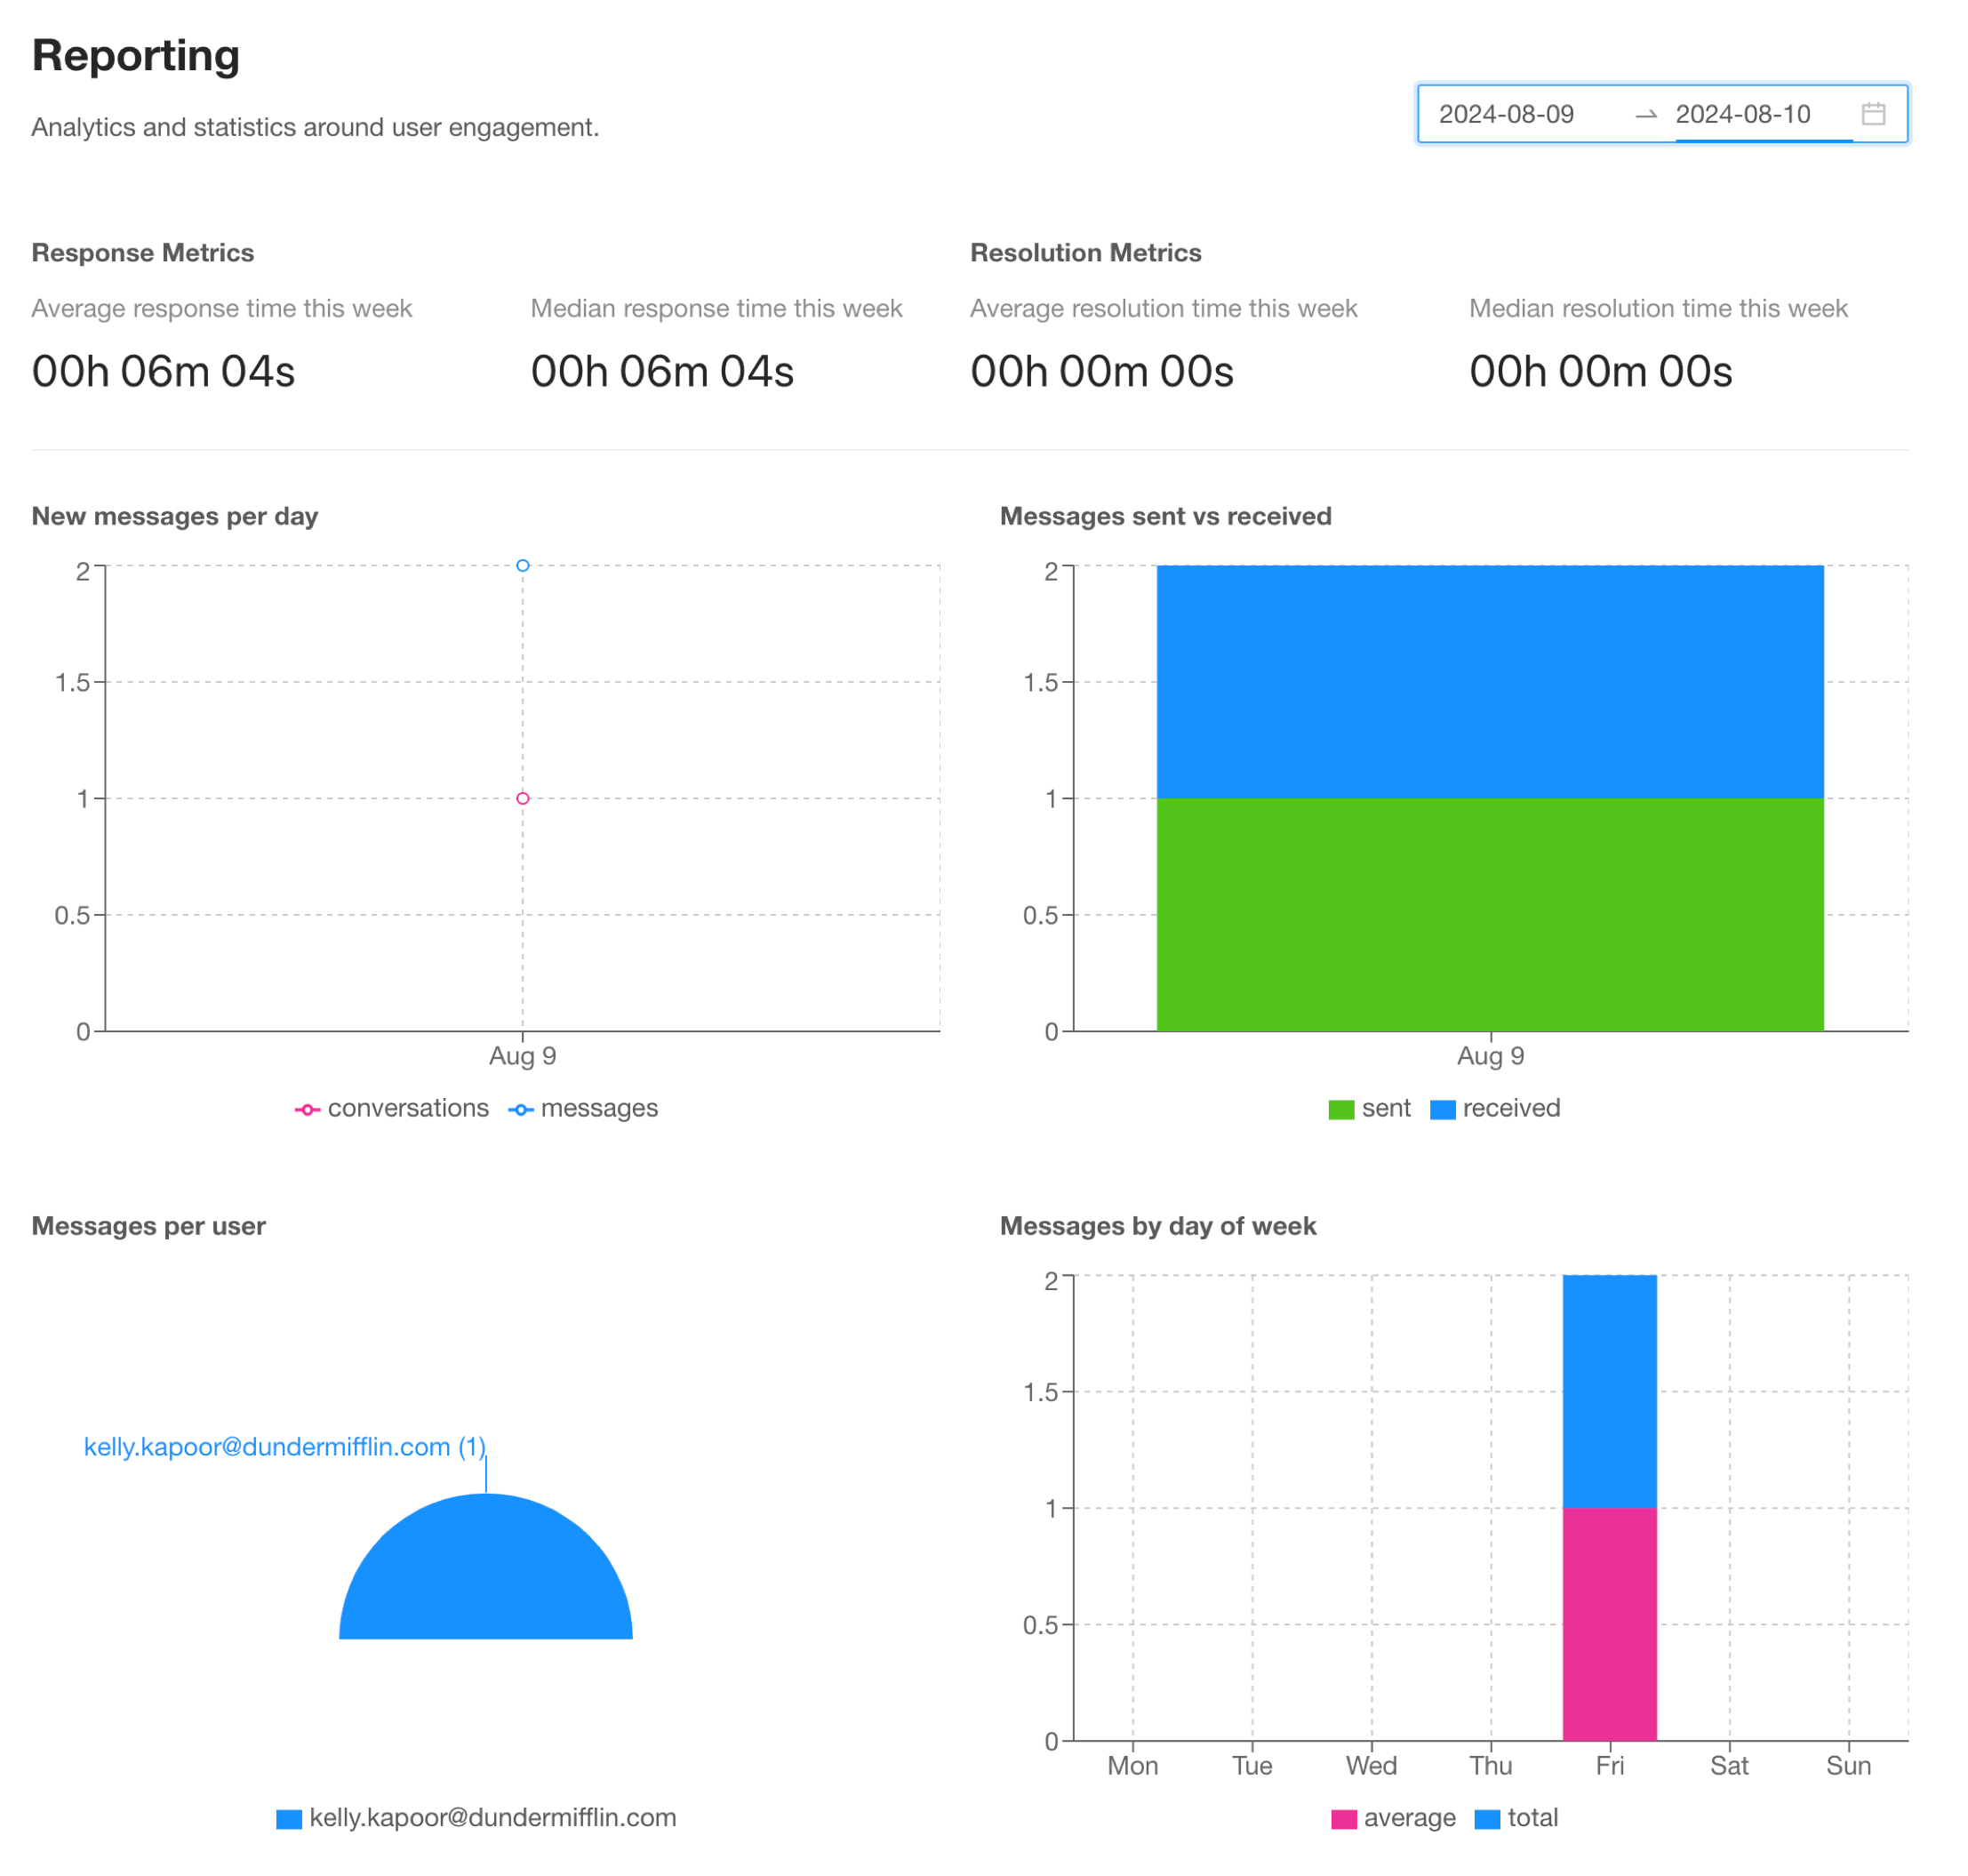
There are two more customer service-specific metrics you want to track too:
- how long does it take for customers to receive the first reply to their conversations?
- how long does it take to resolve the conversation?
You typically want to minimize both.
The time to first reply is one of the key metrics in the customer service business. The quicker you pick your phone, the happier your customers are. The metric improves customer loyalty and reduces frustration.
The time to resolve measures the efficiency and quality of your support team. Quicker resolution also means happier customers. On the operational side of things, time to resolution helps to better plan for the support team’s capacity.
For each of these metrics, Papercups calculates the average and mean time.
Platform Reporting
The platform reporting is a completely internal statistics. Papercups collects it once a week and sends it over Slack.
The internal metrics are calculated for:
- this week,
- the previous one,
- the all-time total.
There are growth metrics like:
- the number of new accounts
- the number of new users
- the number of new customers
- the number of new messages
- the top 4 the most active accounts (e.g. ranked by message count)
- the top 4 the most active users (e.g. ranked by message count)
- the platform MRR is based on Stripe subscriptions
Another batch of metrics measures the usage of different functionality:
- the number of new messages grouped by source (e.g. email, SMS, live chat, etc.)
- the number of conversations per source
- the number of widget installations
- the number of new integrations enabled per type (e.g. Gmail, Slack, Mattermost, etc.)
- the top 4 accounts with the most customers
Other Notifications
Papercups uses the same Slack messaging approach to notify about:
- new subscriptions or subscription cancelling
- new account registration
Summary
Time to wrap it up.
We have reviewed the ins and outs of a customer service platform called Papercups. The product side of the platform, their billing, data organization, and the most interesting technical details of working with all six communication channels it supports.
On the UI side, we have gone through the implementations of the embedded live chat and storytime analytics.
Papercups is a great example of a feature-full SaaS platform done in a radically simple way. A big part of that success should be attributed to using Elixir and Phoenix Framework that do so much for so little effort.
If you enjoyed this deep dive, be sure to let me know and share it broadly.
